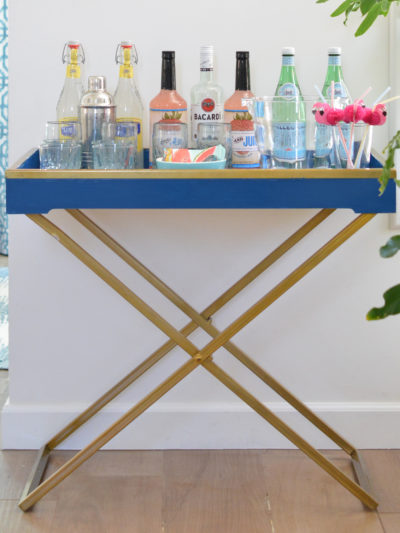
Y’all saw the table we built for our home and in honor of the Pinterest Challenge earlier this week. It was worthy of its very own post, so here is the step-by-step on how we built this rustic dark X base table by hand in a custom size.

We were inspired by all five of these tables (links:1/2/3/4/5 ), but mostly by the dark stain and classic X base shape.

Our starting point was discovering these X base farmhouse table plans over at Ana White (she’s amazing!) and built by at Whitney at Shanty2Chic.

We made a few modifications to suit our smaller space and personal taste, including using less pieces, incorporating a hefty 4” x 4” middle post instead of two 2” x 4”s, and using only a single brace at the top due to the smaller size.
Here’s how we started:
First, we visited a local lumber supply company in search of kiln dried wood since it’s better quality (we chose Douglas Fir for the grain.) We paid more for it, close to $150, but we reasoned it’s a table we’d own for many years so it was worth it.

Once we were home, Matt measured the width of the table to begin the cuts. We laid the three table top boards down and measured their width, cutting the four base pieces first, and Matt also tapered the edges with the compound miter saw.


Once those four cuts were done, we measured to mark the middle section of the top and bottom to center the 4” x 4” post.

Instead of building the X leg first, we secured the base to the 4” x 4” post first drilling pilot holes and securing with wood screws. The legs were secured to the table top the same way (again, pilot holes and wood screws).


To make the “X” we first used cheap scrap 2’ x 4’ wood to figure out the perfect the angle on the compound miter saw, then once we found it, Matt made the cuts for the eight pieces with the Douglas fir to form the “X” on each side.

We mapped out the “X” on the ground to double check all the cuts were correct.

Because we chose the 4’ x 4’ center post, we couldn’t use big screws to secure the “X” (even the Kreg jig was awkward) so instead we opted for long skinny nails – they mostly disappeared into the wood and any visible nail heads add to the rustic appeal.

We used clamps to hold the mini feet in place, and screwed them to the main base of the leg.

The last step was adding a brace to the underside of the table to stabilize the legs, drilling pilot holes first then screwing the brace into the table top.

We turned it over and ta-dah! Our first handmade piece of furniture! Awesome.

The next day I made a trip to my local True Value for a new brush and new stain. This time I went with Minwax ‘Special Walnut’. (Make sure you sample your stain on a scrap piece of wood first!)

Before I began, I spent half an hour sanding the entire table with my orbital to get it super smooth. We thought about going with the distressed look and actually dinging it up with dents and scratches, etc. but in the end decided to keep it smooth since we loved the grain of the wood, those stripes are amazing! I smoothed out all the corners, rounded all the edges, and the sanded the top to prepare it for stain.

Once you sand, be sure to vacuum all the sawdust residue, I use my handheld Oreck and its brush contraption, works perfectly!

The next step is pre-stain wood conditioner, I’ve used this ever since I learned all about staining wood and I definitely recommend it to help prevent blotchy stain absorption.

Next came the wood stain, and it took three separate coats to get it as dark as I wanted it, allowing to dry 6 hours between coats.

Handy tip: wrap your oil based stain soaked brush in a plastic bag and place it in the fridge while you wait for your coats of stain to dry, then you won’t have to clean it with mineral spirits until you’re done with the project.
I decided at the very end to NOT use Polyurethane and instead protect the stain with Dark Wax (not pictured) for a more subtle sheen and I’m glad I did. It takes several hours for the dark wax to dry but after three coats applied with a cotton rag I was satisfied with the darker finish and a less shiny surface than you’d get with a Poly coating.
Dark paste wax can be harder to find than clear wax, but Howard’s makes a Walnut version, and there is also Minwax Dark Paste Wax, both available online if you can’t find them locally. I had some of the Annie Sloan version in my stash, so that’s what I used.
And that’s how we ended up with this gorgeous handmade table for our home!


We’re stoked that it turned out so beautifully, and now I’ve already drawn up some plans for that potting bench we’ve been talking about all these years… now that we’ve flexed our “furniture building from scratch” muscles, we’re hoping to tackle that garden project soon. :) Stay tuned for more pics from this space as it gets a new look!
True Value Blog Squad legalese: “I was one of the bloggers selected by True Value to work on the DIY Squad. I have been compensated for my time commitment to the program as well as my writing about my experience. I have also been compensated for the materials needed for my DIY project. However, my opinions are entirely my own and I have not been paid to publish positive comments.”
Have a great weekend everyone!
.


LOVE THIS TABLE! You and your husband made this look relatively easy to do. What type of wood did you use? I love the “stripes” in the wood grain and how your stain brought them out! :)
Love this table. Great tutorial. As a blogger who loves carpentry project, I have to commend you where you purchased your lumber. The big home improvement stores are great for framing lumber, but your stock is higher quality. Definitely shows in the finished product. Plus it looks like it’s probably quarter-sawn wood, which means the top won’t bow or cup on you over time. Nicely done.
this project of yours is truly amazing!!!!n I have the Blox table from CB2 and I absolutely love it – the look of wood, its sturdiness somehow evokes a sense of “homeliness” than a painted one somehow. You can probably start making and selling your own furniture soon Kate! Great job!
Gorgeous!!! Thanks for all of the information. So what is the difference between Wax & Poly? What are the pro’s/con’s? I have an old piece of furniture from my grandma and I’m undecided whether I want to paint it gray or sand it down and restain it a dark color like your table. Thanks Kate!!! Have a great weekend. :)
My husband and son are in the middle of making AW’s farmhouse table for our yard. I hope it’s finished before summer is over and that it turns out as nice as yours.
I have that pinned too! We are remodeling our kitchen and that is on the I might do that list. Turned out great. Good step by step! :)
That turned out great! I’m wondering if an end table similar to that would be good. I had a dining table made that is so much like this! I’d love for you to take a look at it -www.hypheinteriors.com/tour
This is just incredible! I sound so ignorant but I sometimes forget stuff like this can be *hand* made!
I LOVE your table, it’s gorgeous and chic.
You guys did an INCREDIBLE job!!!
Wow, this turned out beautifully. We have an X base dining room table, and we love it. :-) I love that you made yours yourself — it will forever be a special piece for that very reason!
Wonderful job! The design is beautiful, and the finish makes it looks professionally done. Very inspiring!
I’m in love with this table! Thanks for the tutorial! :)
I absolutely love how the table turned out – it’s so incredibly gorgeous!
Gorgeous, gorgeous results. I actually just bought supplies to make a couple of x-leg stools for my living room (I LOVE building furniture from scratch). This will be my first time making legs with such precise angles so I’m curious how you found the exact correct angles for your x-cuts. I have a simple angle finder but am not sure if there’s a better way.
Hi Jennifer, Matt handled the angles, I think he might have used a protractor tool to figure it out, I’ll find out!
Kate
Can you tell me the dimensions of this table? (Height, width, and length?) I want to do one 36″ tall and about 24″ wide, but not sure if the narrower width would make the “X” legs look funny?
Hi Cherri, I can’t believe I forgot the dimensions! The table is 29″ in height, 22″ inches in depth, and 56″ in length!
Kate
This turned out so pretty! Great job Kate!
That’s just so amazing! Love the colour, LOVE the x-es, love the size.
I love the size, it looks great! I am really going to try and make this, or at least whine until my husband does. Great job!
Great work… U are an inspiration…!
Wow Kate! That really turned out good! You guys give a GREAT tutorial – very step by step. You may have unleashed a monster now – carpentry is so fun and there are a gazillion free plans on the internet, not to mention Anna White’s fabulous website!
Gorgeous…looks great. Love your blog..thanks for sharing.
Kate, this is beautiful! And thanks for taking the time to photograph the process ;-)
A real beauty!
Wow, Kate – if this is your first time flexing your furniture making muscles, I can’t even begin to imagine what you will make next! Flawless exectution, you must be so happy with how it turned out. The dark stain looks amazing and I can picture it set with white dishes, a bouquet of flowers and pretty napkins ready for a family meal! Thanks for sharing the step-by-step how to!! Heather :)
Beautiful job!!! And I’m insanely envious! What is your next project?
Great table, it has very classical lines. Maybe I can get my husband to build for me, otherwise I am tempted to learn to use all those power tools!
Did you, a California girl, just say “y’all?!!” LOL! Being a Kentucky girl I use it all the time! Guess your vacation to Savannah got it goin! Love the table! I’m a fan of the X base & it looks great next to your new built in!
kt
I am sooooooo jealous!
Beautiful Kate!!
Thanks, Kate, would love to know how he did it! I can’t wait to get started on my stools…hopefully next week! Happy weekend :)
I love this size to start with. I really want to make the Anna White farm table for my backyard but this looks like something I should start with first and would make a great table for my sewing machine.
What size boards did you use?
Hi Valerie, we used 1″ x 8″ boards for the top!
That table is awesome!! Sure glad I read this post because I was getting ready to do a stain job and have never thought to use the conditioner – will get some of it today. Thanks for sharing!
Simply stunning lady – so when are you starting your Centsational Furniture line? :)
WOW. I absolutely love this table.
I have to tell you how awesome your table is.. Awesome doesn’t even begin to describe how much I like it.. I fell in love with it.. I have honestly been looking online at pictures of tables I like so I could figure out what I like and build my own. I live in Alaska and have a VERY rustic home, on top of the drywall in my home is milled cottonwood slabs, my kitchen is also made out of raw milled wood, I believe it is birch and pine. My bathroom as well, I have a jacuzzi and it has it’s own little nook made with….. surprise, milled wood. My father in-law has a saw and he likes to play with wood. Anyhow, I am pretty sure you made that table just so I could see it and FINALLY complete my house. lol. Thanks so much for building and posting the pictures of your fabulous table.
If I am refinishing a table with stain, would you recommend using a conditioner first. Thinking you may have used the conditioner solely because it was new “raw”wood.
Well done! Simple, clean lines and beautiful finish.