A few weeks ago, Matt and I agreed to host an outdoor party in early summer in our backyard to raise money to benefit the local public elementary school that my children attend (the committee twisted my arm!) so I thought I’d get a head start on sprucing up the rear yard. We had a bare patch of wall looking a little blah and I’d always envisioned a bench with planters to dress it up.
I went searching online and discovered an affordable ready-to-assemble planter bench, but in its natural state it felt a little too rustic so I thought I’d give it a more sophisticated stain + paint treatment. As you know, I’m a lover of gray and white but I didn’t want to completely cover up the wood grain so I opted for a stain and paint combo and I’m really thrilled with the results.

I started out with this rustic cedar bench I bought for $70 and with a little DIY elbow grease turned it in one day into something more suitable for the style of our home with a few simple products.

This project was pretty simple, I assembled it when it arrived then gave it a two tone stain + paint treatment, trying out a new stain from the Rust-Oleum line of products.

I’ve been a fan of Rust-Oleum products for many years, they’re known for their adhesion and durability, and as I’ve mentioned the Zinsser line of primers (one of their many products) are my favorite.
I met with the Rust-Oleum team last summer in San Francisco and they sent me some of their ‘Weathered Gray’ stain – it’s currently available under the Varathane label but will soon be on the shelf as a Rust-Oleum Wood Care stain. I didn’t end up using it on my wood bathroom countertops but it was perfect for this outdoor planter bench project.

The first thing I did after assembly was to prep the bench with a few steps. The first is to lightly sand to prep the wood for stain. It’s important to sand with the grain, and I used a coarse sanding wedge then followed up with a medium grit sanding wedge.

A smart technique I learned at the Rust-Oleum event was called “water popping” which is basically giving wood a facial just before you stain – using water to open its pores so it absorbs stain evenly. Just a wash with a wet rag (squeeze out all the water beforehand) is all you need.

Next a one coat application of the Weathered Gray stain with a disposable foam sponge brush – remember to stain with the grain of the wood!


I let the stain sit for 3-4 minutes then rubbed away some excess with a cotton T-shirt to allow the wood grain to show through.

The stain dried quickly and two hours later I taped off the stained portions and applied a coat of Bulls Eye primer to the legs for that two tone effect I was going for. I use water based primers outdoors since they expand and contract unlike oil based primers or paints which can crack outdoors in severe weather.

After the primer dried, I applied a single coat of white latex paint to the legs.

I purposefully left the stained wood untreated since I want it to weather outdoors, but if you want to protect it so it doesn’t change you’ll need a polyurethane.

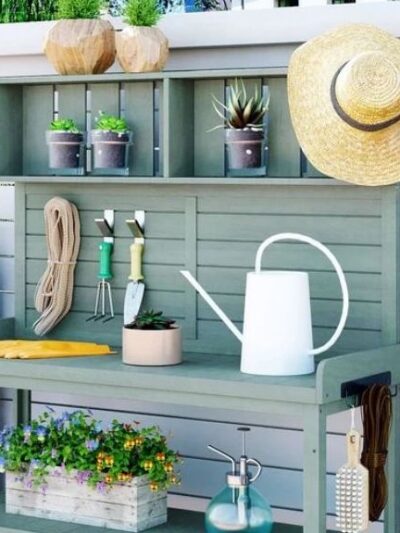
I love how the wood tones show underneath the stain and how it contrasts with the white painted legs, subtle but so pretty!

I also want to thank the Rust-Oleum team for the trip to Charlotte last week. They had a group of us stay at the beautiful Duke Mansion, it’s like a mini Tara from Gone With the Wind, such an amazing historic home turned into a small hotel.

I loved the black + white checkered floor and classic touches throughout.


We were able to play around with their stain and polyurethanes for a day, and as a DIYer in search of top quality products, it’s always nice to get your hands on them all at once!

We played around with all the new stain colors in a beautiful solarium and they’re really nice, some of my favorite stains were “Kona” a deep almost black brown and “Dark Walnut” – I love the classics and those two were really rich, I think they’d be wonderful on furniture, banisters, floors, or stair treads.

FYI, the new Rust-Oleum Wood Care stains are available at Lowes and their stains dry in under 2 hours so you can stain and poly in a day, which really is my favorite thing about them. In the past I’ve always budgeted 3-4 days for staining projects so the fact that these dry so fast is appealing. I’ll be experimenting with other different shades this year – if you give them a try for your next wood stain project, let me know what you think!

If you’d like to see more pictures of DIYers in action, visit the Rust-Oleum Flickr page for images capturing the event in Charlotte. All transportation and lodging provided by Rust-Oleum.
Thanks Rust-Oleum for including me in the event and for creating an great line of new stain products – your ‘Weathered Gray’ stain made my planter bench so beautiful!
.


I love the bench! We could use some extra seating in my home’s backyard, so I would like to follow your lead and stain a similar bench. Would you mind letting me know where you got your bench? It looks great! Congrats!
Hi, Kate! I like your bench but I also like your idea to benefit the elementary school! “Bravo!!!”
Hi Lauren, there’s a link at the top to the source of the bench!
Love, love, love the look of the bench, but the only review on the website states that the quality is poor… thoughts so far???
Hi Brianne, the wood is not the highest quality and somewhat dry so you have to be careful with a power drill – it also came covered in a weird film on some pieces (maybe fiberglass?) which I washed off outside – I recommend assembling it outside too!
Kate
This is perfect! I just bought the new Tarva dresser from Ikea yesterday and I’ve been trying to find a nice grey stain to use on the drawers while painting the dresser itself white. I love this shade of grey! Thanks for sharing!
Hi Kate! Love the bench and kuddos to you for helping out the local school!!!
Love this! The gray is so chic. And the hotel is gorgeous!!
Looks great, Kate! And love all of the pictures of the Duke Mansion!
So pretty and feminine. Love it!
The bench looks great! I also have a love affair with the cool tones and haven’t tried a stain in those hues yet…way to inspire!
i quite like the grey and white plant bench – very well done!
So cute!! I love the photos of the flowers too.
So pretty!
wow, i can’t believe you did that on your own (actually, i can)! It turned out wonderfully! Great job!
I love this bench! It is absolutely gorgeous and I’d love to have something like it in my yard! :)
Hi Kate –
Do you know if the new Rustoleum stains can be used on fences. Also, I have a wood bench that is weathered and will need an update this spring. Do you suggest sanding first or just apply to a wiped down bench? Thanks!
Looks awesome!Thank you for sharing these photos……
Too cute. Great color choices.
What a gorgeous hotel! Love the bling. This bench turned out great and I love the color.
It turned out very nicely and I enjoyed your tutorial.
I absolutely love the cause. I think it is awesome. I plan to do something with my patio this year.
Very cute bench! I love the color and the way it is two tone.
Love the bench! It would be great to have a “tour” of your backyard sometime. Maybe you’ve already done that and I missed, but I’d love to see it!
Hi Kate,
I love your bench. The colors are great. After going through all of your before and after pictures, I went on a painting frenzy. Since our Lowes and Home Depot have such limited quanitites of paints and stain, it seemed the only complete line they carried was the Rust-o-leum so I had to use that on all my projects. I was surprised how much I like them better than most of the stains. They went on smooth and dried quickly. I did dining chairs, a table and my dog gates and still have half the can left. It basically is the only stain I now use. All your work is beautiful.
Love the bench. I recently stained an oak table with this same weathered gray (from Varathane) and it looks beautiful in my kitchen. Followed your instructions from the stained Pottery Barn table. Thank you!
The bench is gorgeous, Kate! I just love the colors you used. It all came out beautifully. Looking forward to reading about your next DIY projects.
Very nice! Do you move it to mow around/under it, or use a trimmer, or just let the grass grow?
Hi Rhapsody, I pulled it out for the photographs but it actually will sit along that back wall on top of the small graveled border so there’s no lawn growing/mowing issue. Good eye!