I’m such a fan of Pinterest and find myself pinning my favorites quotes from time to time. I got to thinking how easy it really is to create your own free printable word art with free online editing software. Not everyone has access to Photoshop or Adobe Illustrator, or the skills to use them proficiently like many talented graphic artists.
I know the basics of Photoshop, and work with it from time to time to make inspiration boards, but most of the time, I turn to the free and very user friendly software programs provided by Picasa that I’ve mentioned in the past. Nope, I’m not getting paid to say, it, I just have been using these two for years and love what they can do! I use them often for my own photo editing and watermarking but they are equally great for creating your own artwork with fun fonts.
If you want to make your own free printable word art for your home in any color, style and font you love, it’s really easy if you follow a few simple steps.
.
Download and Install Your Favorite Fonts. The first step is to find fonts you like and install them on your computer. There are hundreds of free fonts available online if you simply search for them at sites like Dafont, Urban Fonts, Fonts2U, Fonts.com etc.
I’m a PC gal, so I I’m not the one to ask how to install fonts on a Mac (anyone have a link?), but with a PC here are some simple instructions. Once you’ve installed your fonts you can get to work creating your own word art, whether it’s your favorite quote or a bus roll of streets or places, your family rules, or a seasonal inspired creation.
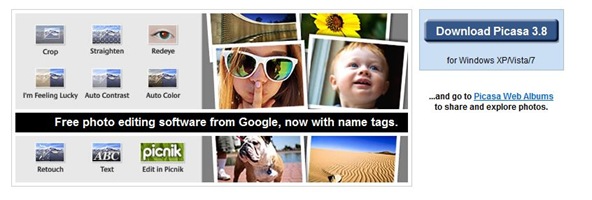
Download Picasa. Many of you use Picasa already and sing its praises, but for those who don’t know, Picasa is free, and it will import and recognize all of the fonts on your computer.
Next, Grab a High Resolution .jpg You want a high resolution image to work with so when you print your art, the fonts are clear and crisp. If you have a snipping tool, you can simply snag a plain white image (say from Microsoft Word), import it into Picasa, and either export the file and resize it (which is more complicated) or simply use the “Edit in Picnik” tool to resize it. I find sizing your vertical image to 2000 pixels by 2500 pixels works well for 8” x 10” printable art. To make it easy, you can download this plain white high resolution image and start with that. (Right click on the blank image and save to your computer).
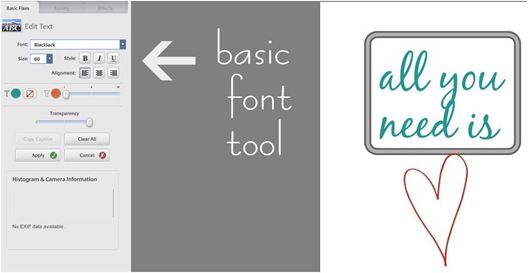
Start Creating. Once you have your high resolution plain white image, you open it in Picasa and begin your creation with the basic font tool.
You can also download and install dingbats which are decorative characters or ornaments attached to keyboard letters. Above I used the ‘BlackJack’ font and the ‘2 Peas Love Me’ dingbats to form the heart.
Let’s say you want to create a printable to remind you of your favorite things about the fall season. You can keep your background color white or you can change it to your color of choice. To change the background, choose “Auto Color” under Basic Fixes and then choose “Tint” under Effects. You can select any color background from that tool.
Next, get to work laying out your fonts, as seen below, with the Edit Text function. The nice thing about Picasa is you can increase or decrease the size of your font with one click and drag, and also tilt your words in any direction, whether it’s diagonal or vertical (like the ‘Scrabble’ tiles above).
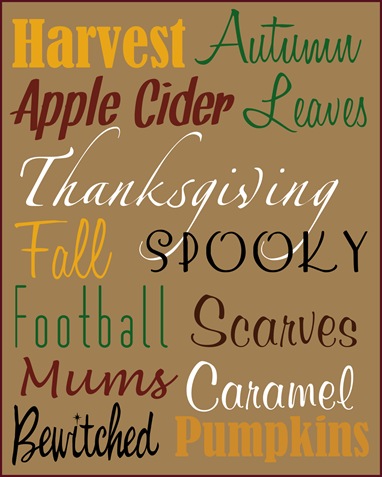
Use whatever fonts or words appeal to you. Here’s just an example of a quick ‘Autumn Favorites’ printable I created in Picasa by using different fonts on my computer and changing up the colors for added variety.
We all have our favorite quotes we turn to for inspiration. Here are two of my favorites I recreated using the same tools in Picasa. 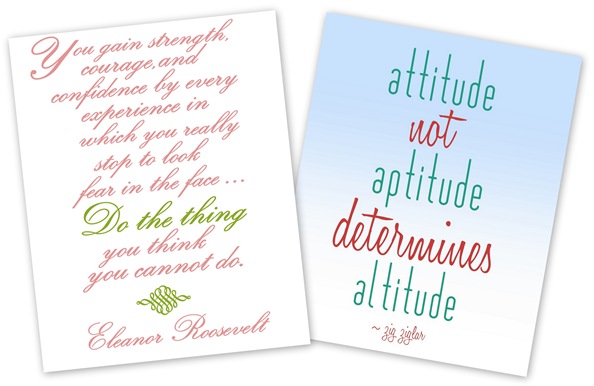 1. Roosevelt Quote: Kutsler Script, Nymphette dingbat. 2. Ziglar Quote: Matchbook and Honey Script fonts, Graduated Tint option in Picasa.
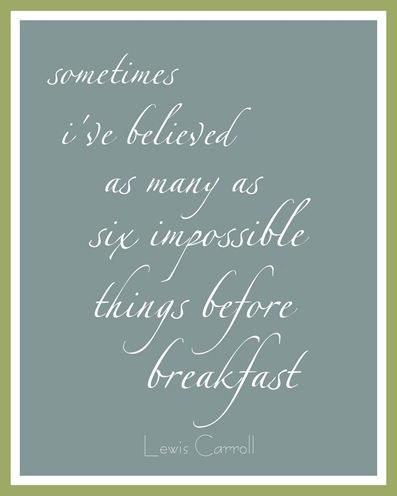
Another great thing I love about Picasa is the instant access you have to Picnik, the sister online photo editing software. For the Lewis Carroll quote below, I added a frame by importing the image into Picnik and then using the border tool.
*UPDATE: Picnik was closed in April of 2012 but you can use PicMonkey to do the same things show below.
Voila!
Afternoon Delight and Berhard Fashion fonts, Auto Color + Tint function in Picasa, frame border in Picnik.
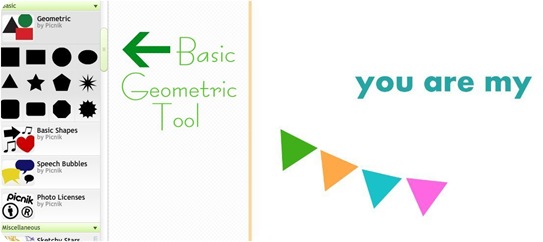
Picnik also has a few cool tools and stickers in their gallery to play with. (use PicMonkey instead, Picnik is closed).
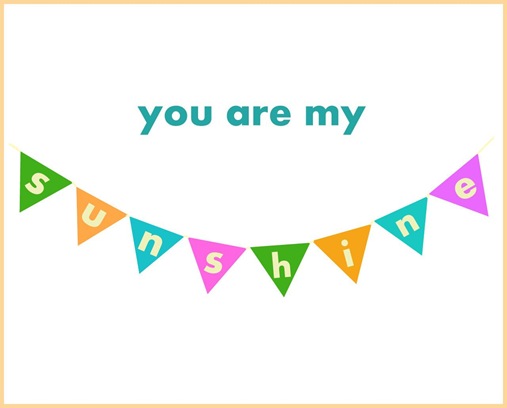
I used the basic triangle in different colors to create this colorful pennant art – a sweet idea for a child’s room.
Once you familiarize yourself with the tools, you can create any 8” x 10” word art you can imagine, in any color you like, from bus rolls to inspirational quotations to favorite scriptures, and print it at home on your printer. If you want something larger than 8” x 10” to frame, simply have your local print shop print the larger size for you.
Again, Picasa and Picnik didn’t pay me a thing, they have no clue who I am. I just happen like their free software, I’ve used them for years, and felt like sharing the creative possibilities with you today!
Have you ever created your own word art with Picasa or Picnik? Got any other tips you’d like to share?
.
.



Thank you! This is the best. post. EVER!
This was the most helpful tutorial on the subject – grazie! Whenever I see “download” my heart freezes, but I’m going to brave it out! :)
Thank you!
xoxo michele
THANK YOU for posting this tutorial! I love you for it!! I was JUST thinking that I wanted to make a quote for my classroom!!
THANK YOU for posting this tutorial! I love you for it!! I was JUST thinking that I wanted to make a quote for my classroom!!
Great, clear tutorial! Just pinned it :)
THANK you so, so much!! I’ve always wanted to do this, but my computer programs don’t work out well for that kind of thing. NOW, I can do what I have always wanted to do :) :)
I don’t know about others, but on my MacBook Pro I just download the font. Double click on the .ttf file and it should open Font Book. There will be a little window that shows the font you just clicked on and a button that says install font. Click install font. It will install it for you. Close Font Book and it should be available in all your applications!
http://support.apple.com/kb/ht2509 This page has more about Font Book and managing fonts on a Mac.
Thanks Kate! This is so helpful. I will be trying this our soon. My son just left for college again and I want to make him some 8X11 inspirational mini posters for his walls and incorporate some of his favorite pictures. I’ll let you know how they all turn out! Renee
Thanks Kate! This is so helpful. Your instructions are fabulous. :-) I will be trying this out soon. My son just left for college again and I want to make him some 8X11 inspirational mini posters for his walls and incorporate some of his favorite pictures. I’ll let you know how they all turn out! Renee
For sure one of the most helpful and easy to follow tutorials I’ve seen! Thanks for sharing your techie wisdom with us. I must have 30 inspirational and/or funny quotes in my Pinterest file that I’d love to recreate. Thanks, Kate!!
I love the sunshine bunting! Great idea. If I were my mother I’d ask you where you stole it from. It’s fantastic. Good job. I *just* deleted Picasa from my Mac because I got Photoshop and decided I wouldn’t need it anymore. Stupid Karen.
I’ve been doing this type of “art” with just basic text editors, but I never realized that I could do them a bit more fancy with Picnik (or with Photoscape I mostly use…). I’ll be trying that for sure, thank you for this advice!
This is fabulous! Thanks!
Thank you! I can hardly wait to try this.
THANK YOU KATE!!!!!
janet xox
Thanks for tutorial! I’ve been thinking about how to make the quotes I’ve been seeing on Pinterest.
Criss
I did really well until I tried to find the basic font tool….I keep finding myself in the edit mode in picnik. Can you tell me where to find it in picasa? Sorry to be so slow!
THANK YOU! Such fabulous info & so clearly detailed….. only 4 months ’til Christmas–I better get to work!
I do this a lot for our house! It’s so great that you can get them for your house so inexpensively. I’ve pinned quite a few ideas that I still need to do. I tend to use Publisher though and just open whichever size I want BEFORE doing the project (choose photo paper sizes). I’ve found that if I create first and then try to size it can through it off. I’ve played with Picasa slightly when you mentioned it once before but I haven’t spent enough time to feel comfortable. I do really love picnik though and it’s nice that they work together.
This is an amazing tutorial! Thank you so much for sharing – I’m a real biffer when it comes to stuff like this but I just love the effect. Thank you so,so much!!
this is such an amazing tutorial-exactly what i was looking for! thank you so much for sharing! happy weekend :)
Thanks for sharing the tutorial! I just used this exact method to create a sign for my son for a back-to-school organization project. Simple and inexpensive. You can see the post here
http://flowerhilldesigncompany.blogspot.com/2011/08/back-to-school-chalkboard-box.html
Great way to inexpensively create art for your home!
This is great!!!! I love both Pinterest and Picasa!!
Thank you! Recently converted to a MAC and I am having a major learning curve issue with creating posters, etc. I know Publisher is not the program of ‘choice’ with real graphic people – but I love it – Hoping I can learn Picasa faster than InDesign!
I am going to be in so much trouble…this could be addictive! Following you on Pinterst has been an education in itself. What a great tutorial, thank you again.
I love you. That is all.
Thanks, Kate! Would you be able to post a tutorial about vinyl decals? I’ve always wondered how to make those, too. Thanks!
Thank you for sharing this, I’ve been wanting to make my own art for so long, but just didn’t know how to go about it. I have photoshop, but couldn’t figure it out. Love this.
THANK YOU THANK YOU THANK YOU!! i’ve seen a lot of this artwork popping up lately and knew i could do it myself but assumed i needed photoshop. amazing! i can’t wait to play :)
Thanks for a terrific tutorial that is easy to follow! I just did a bunch of signs and printables for my daughter’s birthday party and because of you they are so pretty and much more than I could have done on my own. You are amazing, Kate!
wow! made my night! ;) best post!
ashley
Found this on Pinterest, and I’ve been using Picasa for a long time, but haven’t discovered these posibilities untill now. Thank you so much for sharing!! :)
This is an awesome tutorial. I always want to make quotes into wall art like this, but never felt I had the right program for it! Thanks for this…pinning it right now!
Excellent! Thanks for sharing this tutorial. Always fun to see the creative ways that folks are using Picnik.
Best,
Sky -Team Picnik
Thanks for sharing this. I was looking for Adobe Illustrator because I wanted to make wall art with quotes, but now I tried Picasa and I love it.
Just one question. Does somebody know how I can get the crown of the ‘Keep calm and….’ quotes in picasa? I only could find the intellecta crowns font with that kind of crowns, but somehow the intellecta crowns font doesn’t work with Picasa.
Thank you so much for posting this — it’s just exactly what I was looking for!
Thank Youuuuu! I’ve always wanted to be able to do this kind of thing, but thought it was reallly complicated, or you had to buy and download large graphics programs. I’m now using Picnik, and love it! I linked to you, if that’s Ok! (Actually I linked to you twice!) You can check it out here: http://bedroomcrafter.blogspot.com/ S xx
Thank you, thank you, thank you! I have been wanting to be able to do this for years! I am so excited to get started.
This was great! Thanks so much for posting. As I trial I did my own Autumn themed “Subway Art” and posted it on a blog I started with two friends. http://3flygirlz.blogspot.com/2011/08/fall-printable.html
The only thing I would mention with regard to this tutorial is that jpgs are not as clear as other file extentions. Jpgs for some reason add extra pixels, and that is what causes the slight fuzziness around the letters or images. Even at a high dpi. The print quality is better with a gif, png, or tiff file.
Sterre…Are you using the “Keep Calm” font? The crown is included in that font, and it should work in any software program that uses TTF fonts.
Awesome tutorial. I use picnik to make my printables but just recently ran into a problem that’s NEVER happened before but keeps occurring. How can I guarantee an 8×10 print if there’s not an area to type in these settings. For example, I just created a printable and when I go to print it, the top and bottom of the printable are cut off. Ive tried editing the image 4 times and the same issue arises. Let me know if you have any tips for this please :) Thanks so much!
@Sterre – check out this cool website where you can make your own version of the Keep Calm poster – http://www.keepcalm-o-matic.co.uk/ – it is so cool!
You are awesome! I have been trying to find a way to do this without Photoshop. Yay! Thanks a bunch.
That’s really centsational!!! Thank you so much for sharing… I’ve used Picasa and Picnik for quite a while for photo editing, but had no idea you could do this like this… Thanks again.
A wonderful tut thanks for sharing, I found your blog via pinterest and will be back!
Heather x
SERIOUSLY! I make my own invitations for baby showers and wedding showers and parties (I have FIVE full blood sisters!) and am ALWAYS annoyed that I can’t find what is pictured in my head. You have now given me the tools to just MAKE IT MYSELF. I seriously can’t thank you enough for this. Muchas gracias lady!
I do not have enough words to thank you for this tutorial.
Not only I chanced upon a good free software via your blog, I met a nice instructor as well. Kudos.
Brilliant
Lovely tutorial. That’s exactly what I am looking for, lovely lovely….!!
Thank you ever so much and I can’t wait to get start!!
Love Picasa! I use their collage feature all the time to make simple cards or scrapbook pages. I love fonts too! Does anyone where I can find the SCRABBLE font that is used in the blog title image?? I’ve come across one other Scrabble font that I like but this one is much simpler and has a cleaner look. Thanks for any help to find this!!
I love this post! And love Picasa but now I wonder if someone would tell me how to share my printable creations with my blog readers. I have blogger and it seems like the only way to share a printable is to host it on another site. Any thoughts or ideas?
Hey Rachel, I’m not on Blogger anymore so I forget if you can do it. WP is it will store any .doc or .pdf in your media library so you can host it on your own site. Many people use Google Docs – you could try that!
Kate
This is a terrific tutorial. I haven’t had the chance to use it yet, but I definitely will. Wanted you to know that I gave your how-to as an example and linke to it in a blogpost I published today. http://onceuponafirefly.blogspot.com/2011/10/jump-on-subway-trend.html
Thank you for so generously sharing your tutorial. –Ann
HOLY COW!!! THANK YOU!!!!!!!!! How did I not know about this before?!?! Oh the POSSIBILITIES!! Thank you thank you thank you thank you!!!!
Thanks so much for this post. I made my first free printable and posted it on my blog today. This is invaluable! Blessings!
My wife and I did some Pirate themed art last night using Picnik (our older Mac doesn’t support Picassa) – and it is just awesome!
Thanks for the tutorial and guidance!
CP
Thank you so much for the tutorial! Is there a specific paper that you recommend? I tried to print off a printable off of a blog on cardstock paper and while it looks okay it certainly has room for improvement. The colors were not as vivid as I had hoped and there was some pixelation…maybe its my printer?? It’s a basic Kodak model. Thanks again for the tutorial!!
HI Diane, I use laser print paper with my laser jet printer, and print on high resolutiion, that seems to help!
Kate
I hope this isn’t a crazy question but is there a special paper you print it on? I am asking because I think this is ANAZING and I need word art to stick on a wall. I know there are decals sayings but not what I am looking for. Or is this just for things to create print and frame?
Hi TLC, this idea is meant for frameable art, but you can always have custom vinyl made, there are so many shops online who offer that!
Kate
Thank you so much for this info!!!!!
most helpful blog spot ive ever read!
Wow, what a fabulous tutorial..must see how this will work with a MAC!!
Hi Kate…I just found this tutorial when I was trying to download a font to my PC. It’s amazing. I just have one question. I have noticed in your recent posts that you sometimes put a transparent bar behind a title on your pictures. Would you mind sharing how you do that? Thank you so much.
I know this may sound dumb, but how do you save a “white” image from Word?? Just wondering! thanks =)
Hi Vernonica, you have to take a screenshot or use the Snipping Tool on a PC of a plain white page and save it as a .jpg to get a pure white space! I’m sure there are other ways, but that’s how I do it!
Kate
Thank you Kate. This has helped me a lot :)
what will we do now that picnik is closing?…
So I downloaded Picasa & saved the high resolution white page you posted. When I open the photo in Picasa I’m not seeing the basic font tool…. Is there a step I’m missing? Help!
Hi Kimber, it’s there – it’s called the Text tool, click on that to use fonts in Picasa!
Kate
Wow – I can’t wait to try this!! I’m obsessed with subway art right now and wanted to find some to use in my home. Now maybe I can try making it first before I spend $150 on the one I really want!
Once you have the art made…..then what? This is the part I struggle with. How do I put it on my blog to be dowloadable?
Hi Lynn, it’s a .jpg so you should be able to just save it as such then import it into your blog post!
Kate
I’m sorry, I must just not get picasa at all, but I cannot for the life of me figure out how to get different words in different fonts. Everything in the text box is the same size and same font and I can’t make a second text box. I can’t highlight any particular words to try to change it that way, and you mention nothing about how to do this in your tutorial. I’m really frustrated.
Hi Tara, you have to click on the text box itself to resize it! Once you “approve” your initial text, you can make a second. Clicking on the text box where the font is gives you access to modify it, sorry you’re frustrated but keep trying, the tools are there!
Kate
Hi! THANK YOU for sharing this great tutorial. I made my first printable and posted it on my blog thanks to you and your infinite wisdom. :) Did I do it right?
http://homemademodern.blogspot.com/2012/02/valentine-vignette-and-printable.html
I have the scrabble letters, and want to put them on class tiles? What can I use clue them on the tiles? I have tried several clues and adhesives… I have printed the letters on translusent Vellum.
Thanks. you shared great tips. I have tried my hand at a printable. And I am looking forward to doing many more.
http://fuchsiavision.blogspot.in/2012/03/first-printable.html
Thanks for a great tutorial! I have learned so much on Pinterest. Who says it’s a waste of time? Not me..the inspiration and ideas are limitless. I can’t wait to see what I can create!
OMG! THANK YOU!! I feel like a whole world is now open!!
Awesome absolutely love this thank you so much!
Awesome absolutely love this thank you so much!
wow cant wait to try this – thank you sooooo much ELaine xxxxxxxxx
Just fyi, since Picnik is closing, PicMonkey (http://www.picmonkey.com/) works pretty much the same way. No sign up & it’s free.
Thanks for sharing Breenah, been over there and I think PicMonkey is sooooo great!
Kate
Thank you for sharing your method. I had no idea about the high resolution white page. That was a great tip!
I tried changing the the background color but it only tints it sometimes, I cannot get it to change the navy blue color I want. I clicked auto color, and then tint, but when I click on the color I want nothing happens. And I missing another step?
Hi Taylor are you using the color selector tool? Make sure you 1. Click on the larger rectangle at the bottom of the vertical tool bar to trigger the color selector. 2. Select your color from the HSL, RGE, or WEB color choices, click “OK” then 3. click on the Paint Bucket tool in the toolbar then move your mouse so that the “bucket” lingers over your new image and right click to change the color of the background. Make sense?
Kate
It’s really a nice and helpful piece of information. I’m happy that you just shared this helpful information with us. Please keep us up to date like this. Thank you for sharing.
I am sad to report that Picnik has gone out of business as of April 19, 2012. They referred me to: PicMonkey, Picasa or Aviary.
Yes Carla, I love PicMonkey and Picasa is good too, though not as many options.
It’s really HELPFUL :) Thanks for Sharing…
Thank you for sharing this! I am excited to try it! Is there a way to change the color of the font to a print? I’m looking for some leopard print words… already have a great font, but it’s just black.
Thanks!
Thanks for the great post! I wanted to mention that Picnik has been succeeded by a new web page called Ribbet – it’s not owned by the same people but somehow they bought the rights to redo Picnik ex.act.ly. I love it, I find it a lot less buggy than Picasa or PicMonkey, or even the previous Picnik. Ribbet.com (They have no idea who I am, haha)
Thanks so much Callie, I like PicMonkey but I’ll try RIbbet!
Kate
This is a terrific tutorial. Thank you so much !!
Have a great day !
Thanks so much for this, now I can finally make my own! :-)
Thanks for the tutorial. I’ve been searching the web for how-to’s on creating downloadable invitations. This is a great help!!!
I found this through a google search and this was the perfect level tutorial I was looking for! I love the idea of using a high-res white “image” as the base. Thanks so much!!
I cannot figure out how to export the word document into Picasa. I cannot save the word doc as a jpeg either. Any suggestions?
Hi Holly Campbell, click on the page then right click to save the white page you your computer.
Kate
Thanks for the tutorial, just made some for my blog!
Thanks for this! I’ve been wanting to do a wall of quotes and scriptures but I can’t find myself paying $10 for words printed on paper as much as I appreciate the artistic vision of graphic designers…this girl is on a budget! lol.
Thanks for this! I see these printables on Pinterest and like Ashley I can’t bring myself to pay for them! Thanks again!
THANK YOU!! Will try this right away! I am a quote fanatic and will be doing a ‘quote wall’ for my house but I couldn’t figure out how to make them look this good. I am SO excited to try this! Also, while on Pinterest (I am ADDICTED!) I saw how you can take any print and coat it with this special “paint” to create an instant dry erase board surface. This would be perfect for work- have a large print of one of my favorite quotes but be able to use it as a dry erase board too!
Thank you, thank you, thank you!!! I ran across this today when working on something for a baby shower. Just what I needed!
Thank You Sooooo Much!!! I too cannot bring myself to pay $$$$ for wall word art. Probably a silly question but what do you print your word art on in order to apply onto a wall? Cheers,
OMG this is so helpful! Creating wall art for our kitchen and this is exactly what I needed to make that happen!
I have Picasa on my computer and use it to edit photos, but didn’t know I could create printable word art. I saved the high resolution white page and was able to open it in Picasa. How do I get the downloaded fonts into the list of fonts in the basic font tool that pops up? I saved it to my computer, but I must have to somehow get it to show up in the drop down box of fonts, but can’t figure that out. Can you help?
Picasa should recognize any font installed on your computer Kathy, try closing the program and rebooting your computer, that should work.
Thank you so much for this! I was trying to figure out how to have a white background and this was perfect!!!
When i download the white background, it says the DPI is 96, I thought a high resolution jpg was 300 dpi. I have tried to use it for a canvas and the company says it is not high enough resolution. Can you help out with this at all?