It’s Week Three people! We’re halfway through the One Room Challenge and you want to know something completely crazy? Right now I’m on an 11 day trip to Scandinavia. I landed in Copenhagen this morning where I’ll be for three more days and then I’ll be visiting Norway and Sweden. Am I crazy to take this trip in the middle of the One Room Challenge? Yes. Certifiably. Rest assured I’ve got it mostly under control and another ORC post scheduled next week. So let’s talk tile.
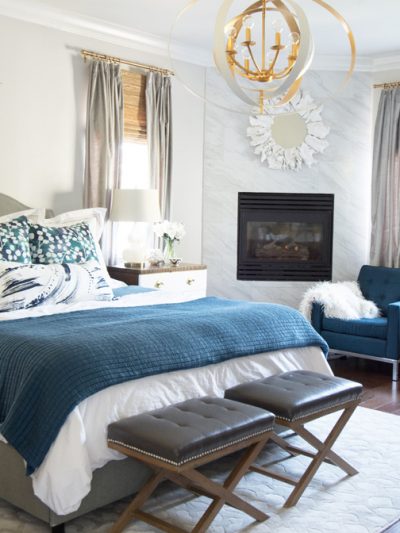
Corner fireplaces are a struggle. I mean I get it. Somewhere along the way someone wants to squeeze a fireplace into a room and not take up a lot of wall space and so someone makes this decision “Let’s just tuck it into a corner.” Personally, I prefer a fireplace on a straight wall to allow for a full mantel surround and for it to be a focal point and if I had my way that would be the case in my master bedroom, but that’s just me being picky.
I have a gas fireplace in my master bedroom and in the winter I will confess that it’s heaven being able to turn it on to warm up the space. I can read my book and drink a glass of wine by the firelight, who wouldn’t love that I ask you. Yes, I’m spoiled.
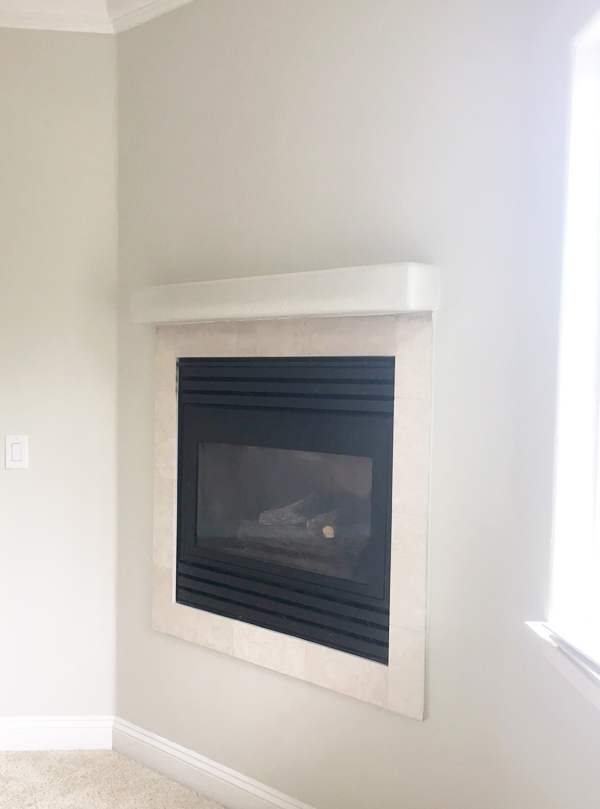
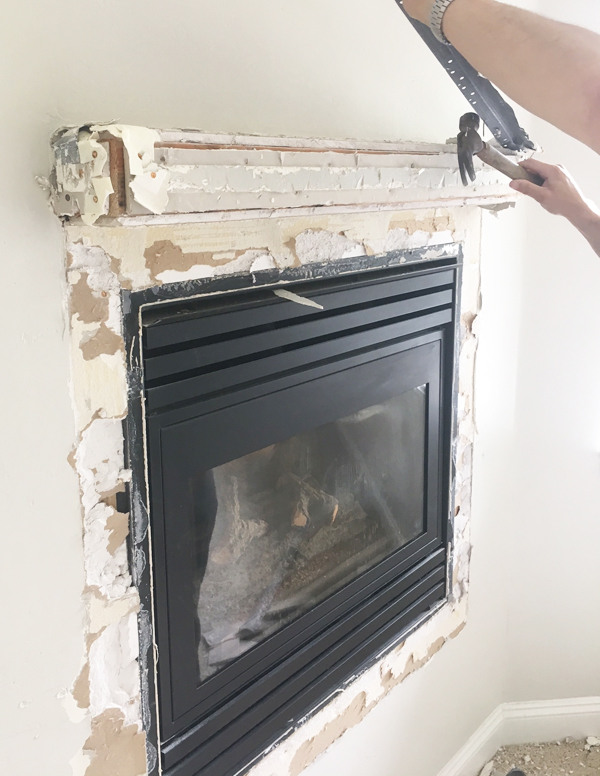
However when I look at it spatially I am irked that the fireplace is in a corner. Yet it was something that had to be reckoned with in this One Room Challenge in this process to makeover my bedroom. Previously there lived an odd mantel made of sheetrock coupled with some not so terrible off-white marble tile. (See below.) The tile wasn’t bad, it was the strange mantel that bugged me.
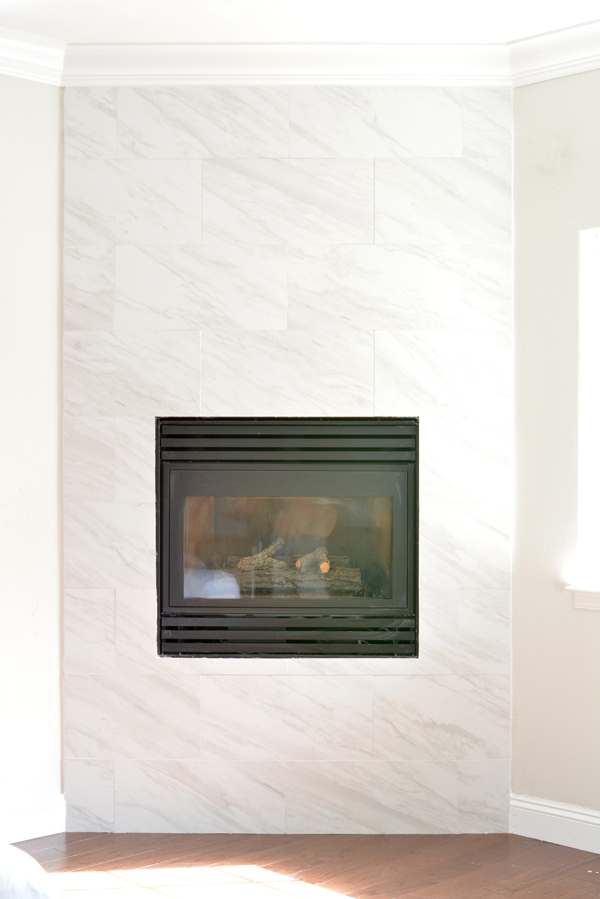
My inspiration for my fireplace makeover was a look that was more contemporary, like those tile installations that go floor to ceiling with nothing more. Like this and this and this but with a classic marble pattern tile.
This was a DIY team effort. Here’s how it turned out!
I partnered with Floor & Decor on this project because it made so much sense. I’ve worked with them many times in the past and enjoy the experience of shopping for tile so much more so than shopping for shoes.
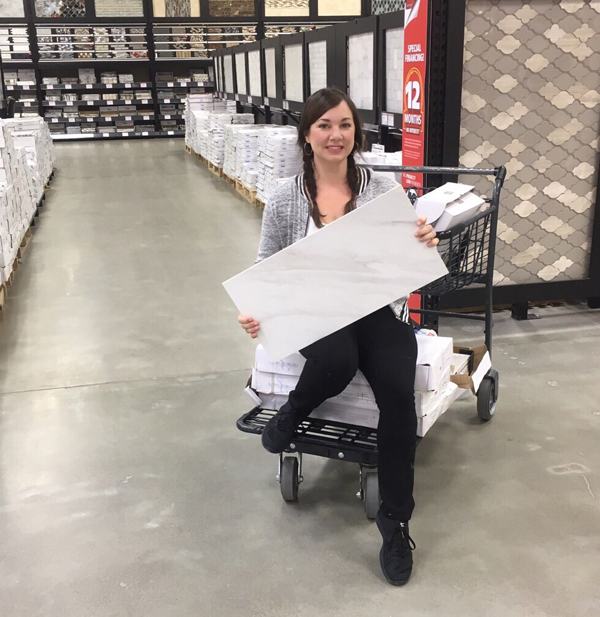
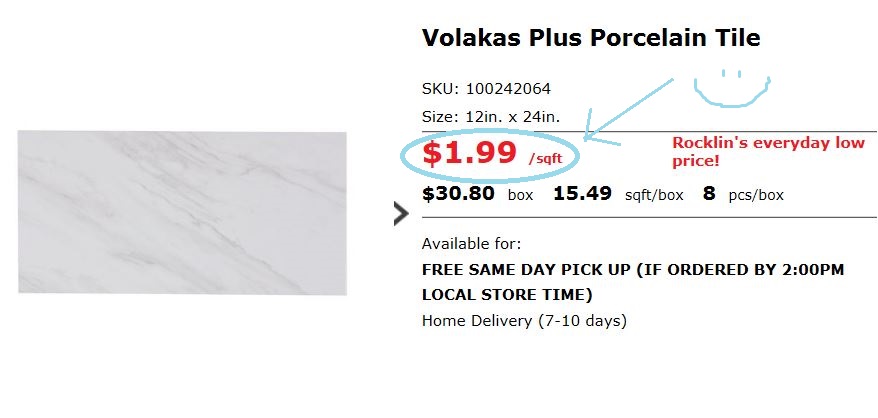
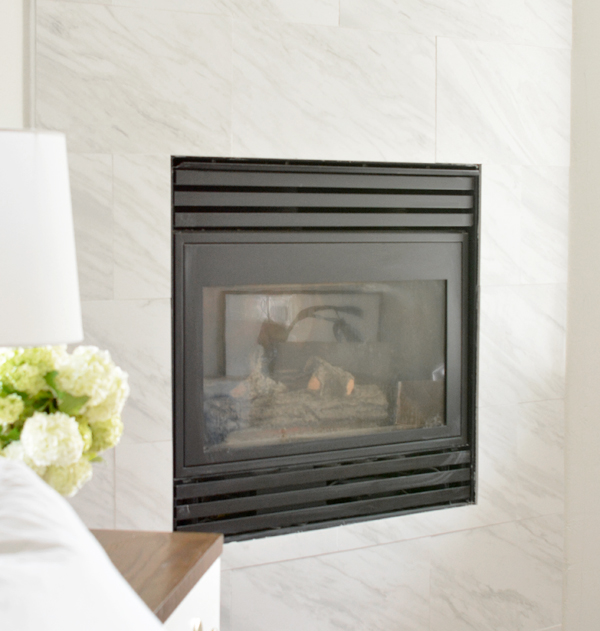
I took a trip to the closest Northern California store in search of a large scale marble pattern tile for the wall and easily found it there. There are dozens of marble tiles to choose from in all shapes and sizes and in bold to subtle patterns. The one I chose was the Volakas Porcelain Marble in 12 x 24″ and it was a great deal at $1.99/square foot.
Here’s a look at the fireplace before we began, you can see that funky drywall mantel and the not so horrible tile.
We removed the old mantel in in less than an hour, Matt did most of the dirty work. After that Matt patched the drywall to prep it for the new tile.
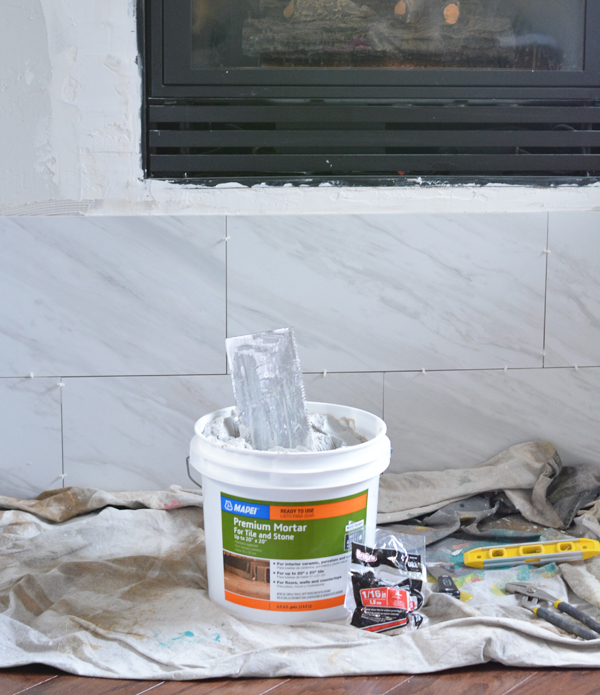
I’ve done a lot of tiling in my life, the steps are pretty basic, I documented them here and you can find a zillion tutorials online. Smaller tiles and mosaics are easy but when you’re working with large scale tile like the 12 x 24″ tile I chose, installation can be trickier.
First, every piece is so heavy and if you’re building up a wall you need to make sure there is sufficient mortar on the wall to hold it and also a strong base to support it. After all each row is sitting on top of one another and the last thing you need is for it to come off the wall or cave in or something tragic like that. Second, you have to really think where you want the tile to be in the final outcome which takes MATH.
I knew I wanted the focal point piece of tile to sit right smack dab center above the fireplace, and I didn’t want any crazy cuts or grout lines there so I convinced Matt we needed to work backwards and outward from that point. We needed to build a base to support that row of tile that would sit front and center, but then subtract the distance to the floor, make the cuts and build up to it. I know it sounds weird but it’s what made sense in my head. And it worked.
So we nailed a piece of wood to the wall to create the tile support for that focal point row of tile.
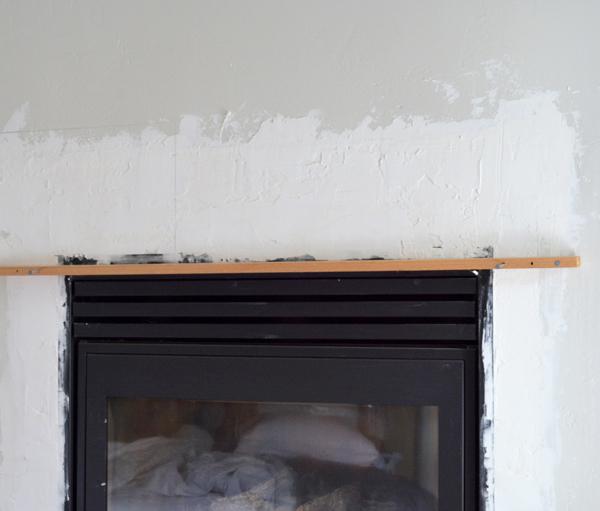
Following the math, we ended up with the first row cut down a few inches to the proper measurement and started building up from there.
At the end of Day One the math ended up being correct and I knew I had the proper distance between the floor tile and the center row tile above the fireplace and called it a day.
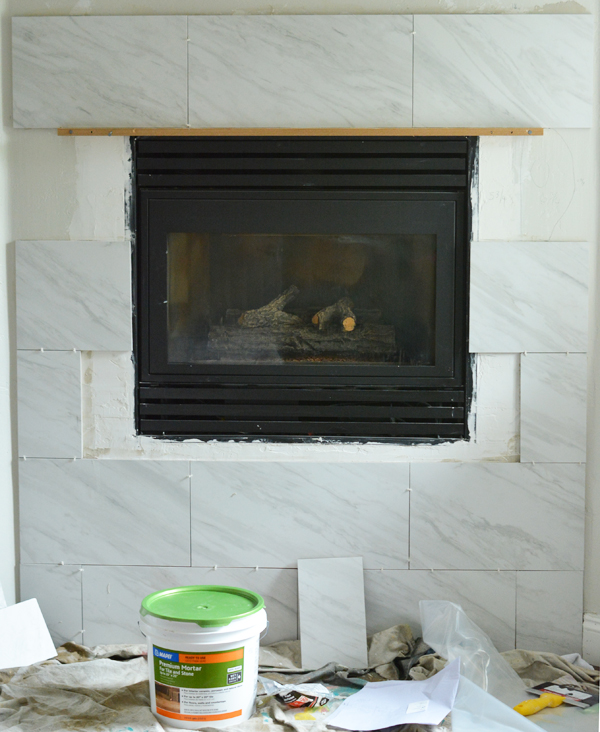
One Day Two we filled in the remaining pieces. This is a strange out of focus picture but it shows what was the most difficult cut, the L shape that sits at the bottom of the fireplace. That L shape ended up at the bottom of the fireplace instead of at the top which is what would have happened if I had avoided the math and started with full size tile at the floor and worked my way up.
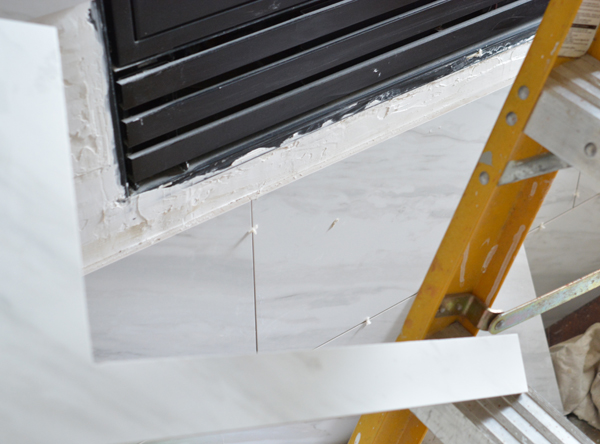
I should mention I like thin grout lines so I worked with 1/16″ spacers and also used grout in the Frost color to fill in between the tile once it was set.
![]()
And you do want to ensure each row is level as you make your way up the wall!

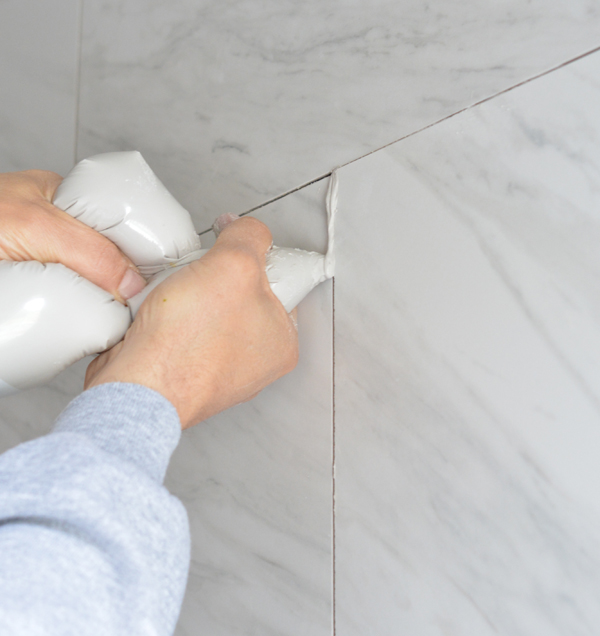
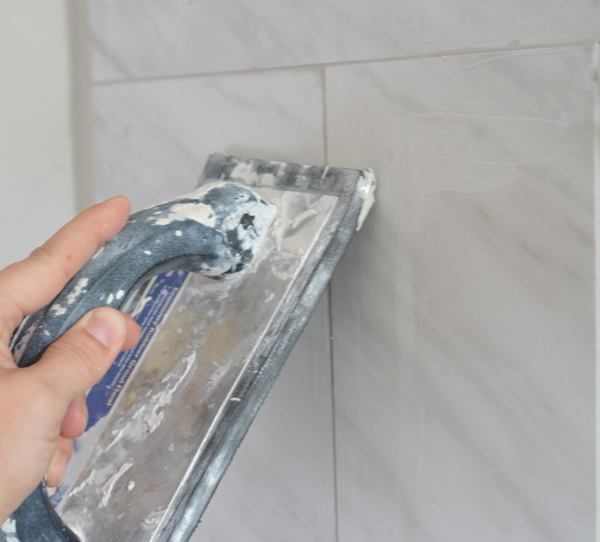
Here’s a little trick for thin grout lines. We used a plastic bag filled with grout to squirt it into the gaps, kinda like you’re decorating a cake, and then used the grout float to wipe away any excess, it worked great!
And here’s another stroke of luck: the grout line is the exact place I need to drill to hang the mirror I found for this wall so I don’t need to drill into the tile itself. Serendipity!
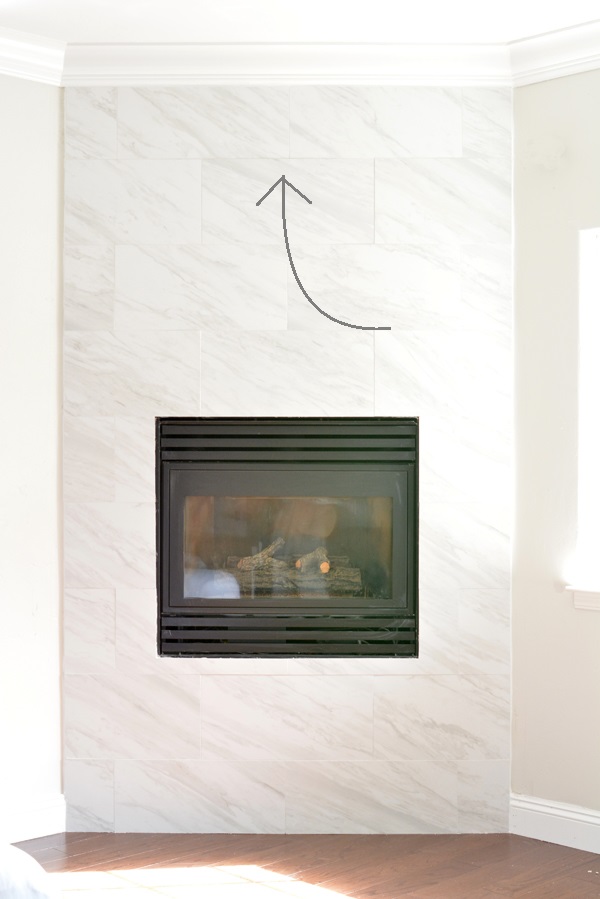
I really do love this tile for its subtle pattern, large shape, and matte finish.
More pictures of the fireplace and the final decor I chose to hang above it will appear in the final reveal coming on May 10th.
More bloggers are making progress in their One Room Challenge spaces, catch up with them all below!
Chris Loves Julia | Christine Dovey | Dwell With Dignity | The English Room
Glitter Guide | House of Brinson | House Updated | J+J Design Group | Lark & Linen | Abby Manchesky
Nesting Place | Old Brand New | Old Home Love | The Pink Pagoda | Rambling Renovators
Erica Reitman | Sketch 42 | Suburban B’s | Erin Williamson Media Partner House Beautiful | TM by CIH

.
This is a sponsored conversation written by me on behalf of Floor & Decor. The opinions and text are all mine.


Hi Kate,
Is there much difference between this tile and the one from Home Depot that you tiled a shower in the flip house? I need something inexpensive like this for a bathroom.
Thanks,
Nancy
They’re very similar !!
Just gorgeous! The first picture almost makes it look like one large seamless piece of marble, probably because of the thin grout lines. Thanks for the tip on piping grout…I may need to use that soon!
Doing the math makes all the difference! Love the contemporary and clean look of the new tile.
Love the little grout trick! The new fireplace looks great!
Looks great! Can’t wait to see the rest. Can you tell us about the trip. Did you use a company to plan it all? Was it a special? My friends want to do there next year. I would love to hear the details so we can know where to start with our planning process.
I’ll write a post on my trip in May !!
What a difference! Love how clean and modern this feels. It also looks great with your warm wood floors. Happy travels.
The fireplace looks great. I can’t wait to see what you do with the space. As a first time doing the ORC, I am blown away with how much you are each taking on in such a short time!
The fireplace looks gorgeous! Have a great trip!
Love that tile you chose! It looks fantastic. We have a weird corner mantle in our bedroom too that we’re planning to makeover soon. Love what you did with yours!
it looks incredible! and you are SO freaking cute.
The fireplace looks so much better – and more intentional – when it’s completely tiled. Hurray that you don’t have to drill into the tile (that’s always a scary task!). Looking good so far :)
Kate! I hope you are enjoying your trip! The fireplace looks awesome. Please tell me that you are not getting rid of your beautiful Z gallery mirror that you had above your bed, if so…I want it!!! I love that mirror!
Ha ha yes it’s time :) but you can still grab it at Z Gallerie!!
Wow! That marble is so clean and stylish! Love it.
Thanks so much for this write-up! We JUST chose this as our field tile for our master bath reno. Do you recall how much variation you got with the 12×24’s? I keep trying to count the number of distinct tile patterns but they’re very complex.
And now you’ve inspired me to order some extra tile for our fireplace. Maybe next winter. ?
I was trying to count them too and couldn’t keep up, it looks amazing because there are no obvious repeats. Good luck with your project!