We’ve been planning to paint the exterior of the shelter house we adopted through our local COTS for about a year (recall the bathroom and kitchen remodel from 2012) and I’m so happy to share that this project is finally complete! Long time readers know we’ve dubbed our efforts to improve spaces for our chosen non-profit The Alma Project and we love fixing up spaces on behalf of the program.
The exterior of this shelter home was neglected and very sad, and it was in desperate need of new paint. It took several months to coordinate with donors and our painter, but at last we’ve finally finished the home’s exterior and we’re proud to report it is dramatically improved!
Here’s a glimpse of the front porch and you can see how much the exterior had deteriorated. Our team prepped and painted the entire exterior of the home in late August and then spruced up the porch over the weekend, adding a new light fixture over the window, replacing the front door, the mailbox, adding some simple DIY shutters, and a few plants. All of those little touches made such a difference.
Before:

After:

Choosing paint colors for an exterior is extremely challenging, it’s one of those decisions you can’t mess up since you’ll be mixing many many gallons of paint! It took me several days to narrow down the right color, I painted ten different colors on large cardboard swatches and the team studied them in different light, and eventually we decided on a gray with a hint of olive green to it: ‘Meadowlark’ by Glidden.

Painting the exterior involved four main steps:
1) Power Wash. All homes need a thorough power wash before the process of painting, you can do it yourself or rely upon your painter to do it the day before.
2) Prepping the Exterior: There may be peeling paint, cracks in the stucco, or siding that needs repaired before the priming or painting steps, talk to your professional painter about the best way to deal with your home. With this simple wood siding, the windows were covered in plastic and some of the battens were refastened.

3) Primer. If your home has been painted before with water based paint, the priming phase may not be necessary. In this case, we were covering previously stained wood siding so we used Zinsser Bullseye 1-2-3 to cover the entire home. We hired our friend Mike (a professional painter) at a discount rate to complete the job of painting the home on behalf of COTS.
If you’re looking to hire a professional painter, see these five recommended tips and if you live in the North Bay, and need a professional painter, call Mike Christy at 707-246-0409 or email [email protected].
Water based primers and paints are best for exteriors since they have built expansion qualities that oil based primers don’t and an oil based primer can crack in extreme weather.

Mike primed the siding by spraying a coat of primer, then back rolling to get the primer into the crevices of the wood. While the primer set, he sprayed another light coat on top to cover the previously stained siding.

4) Paint, Two Coats. 24 hours later Mike used the same technique to spray and backroll the paint to achieve uniformity. He recommends low sheen for exteriors because flat collects dirt too easily. On the last day, Mike brushed and rolled the window and door trim, and the exterior is MUCH improved!


He didn’t paint the gutters since they were powder coated at the factory and in great shape. Their dark color inspired the choice to paint the front door black to add contrast against the white windows and trim on the home.


The shutters were a quick and easy DIY project, Matt trimmed the window with 1 x 3” boards then created two simple shutters. For each shutter, he used three 1 x 4” boards (vertical) and two 1 x 3” boards (horizontal) and attached them with a nail gun to the sides of the windows. I caulked the window and spackled the nail holes, then painted it to white, the shutters help give the window more dimension.

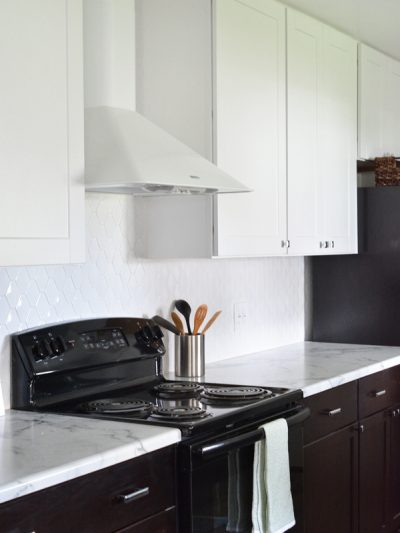
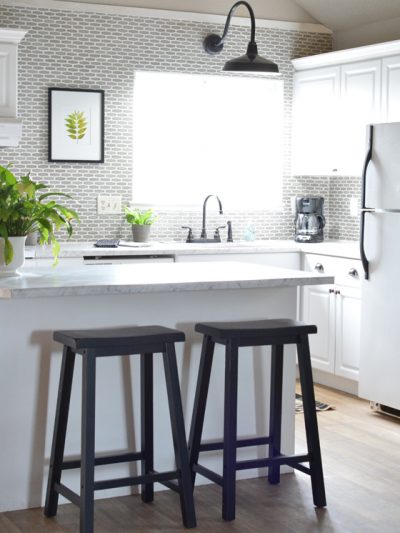
And you can see a glimpse of that green pendant light hanging down? You’ll recall on the other side of that same window is this kitchen! Read more details behind the purpose of this shelter home and see the kitchen before and after here.

A HUGE HUGE THANK YOU to our donors for this project, Rust-Oleum (parent company of Zinsser) who provided all of the Bullseye primer, thank you! And Glidden Paint, who donated 15 gallons of Meadowlark and 5 gallons Oyster Shell for the trim. It means so much when brands support our efforts, and we really couldn’t afford to accomplish what we do without their support. Please remember the philanthropic donations of Rust-Oleum and Glidden next time you’re shopping for primer and paint – your support of these companies helps us!
And if you’re looking for tips on painting trim or choosing paint colors, there are a series of videos available for your review on You Tube, short how-tos that will help you next time you tackle a DIY painting project!
All of the supplies to finish the porch including the wood for the shutters, the planters and pots, the new light fixture, and mailbox came from Home Depot which I purchased on behalf of the project.
These charitable efforts are truly near and dear to our heart, and Matt and I will continue to improve spaces and houses with The Alma Project in 2014. My goal is to continue to partner with home improvement brands and be involved in more remodels and space makeovers in the near future, I’ll share more ideas soon!
.


It looks beautiful, Kate. It’s terrific how you use your talents and resources to help others. Thank you!
Oh my goodness! What a before and after! Just saw this post up on facebook and had to swing in. Such a cool project! :)
It’s amazing what a little paint can do! Such a gorgeous transformation!
http://happinessiscreating.com/
Huge improvement. The shutters make such a difference.
Love that a deserving person gets to tap into your talents! It looks great, Kate.
It looks great; they are so lucky to have your team working on their behalf. Let us know when we can contribute in the future.
I love these posts about The Alma Project! Great job!!
It was dreary before and now looks so happy! They’re blessed to have you help them!
What a difference! Looks great, the color is really nice. And that kitchen, WOW!
Xo
Keeping it thrifty
Beautiful job, Kate and Matt! So thankful for your hearts for people in need.
Wow, what a difference some paint can make! It looks amazing. You always pick the perfect colors.
Could we hire you out to pick fabric swatches for our living room pillows and drapes?!
Amazing transformation – great job Kate!
There ya go, again, Kate, making me choke up with emotion. You use your gifts so generously and I have no doubt that there is a child who is watching this shelter’s transformation, who will be inspired to use his or her own talents to restore homes. It’s contagious! While the material things in life do not matter much, having pride and a beautiful home to live in DOES matter. Keep up the fantastic work!
Amazing what paint can do.
It’s amazing what a little paint can do. What an inspirational project from start to finish!
Wow, what a wonderful difference! The exterior finally matches the lovely interior work that you’ve done. The shutters are such a nice touch. I’m sure the families really enjoy seeing this new view when they arrive home at the end of the day.
It’s absolutely amazing what a little bit of paint can do. The shelter looks great. Those paint sprayers are miracle workers, aren’t they?
I love seeing the amazing changes you do with the Alma Project…they are among my favorites of all your posts, Kate! Not only is it great to see such care taken with a neglected house and to know how you’re helping others, but it’s also great to see what you can do with easily accessible budget materials!
I appreciate your philanthropy in this real world project. A win for the families who will now live in a home that raises their spirits, for the contributors who accomplish more than a sale, to your group of volunteers who support their community and to your readers who learn so much from your design talent and generosity. Bravo!
Thank you Shelley (and everyone) it is such a pleasure working for this project~
Kate
Looks like soooo much work, but the results are fantastic. Love the white trim with the grey base.
Its hard to believe that beautiful kitchen was behind that dark and dated exterior. Now they match and look perfect together. Great job to you and the whole team working so hard for such a great cause!
What a beautiful job and positive change to this little house…and a beautiful cause to match. I tried to look further at the kitchen project, but the links opened up to a pen company. Where can I go to see more of this project?
I’m sure you are angels to the Alma Project!
What a transformation – love the new front porch! I always enjoy the Alma Project posts! Truly good work you and the other volunteers are doing.
The centsational girl is…sensational! Looks Magnificent.
What an amazing transformation Kate! Keep up the great work.
Wow! These before and after photos are stunning! Great job on the exterior painting, and thanks for posting the helpful tips about how to prepare the exterior of the house for painting.