Billy is so my boyfriend. Billy and me, we got a thing going on. But whenever Billy arrives at my door, I still find he is too ordinary, too plain, unacceptable in his current state. I find it necessary to improve him and refine him so that he is oh so much better.
I’m a fan of the IKEA Billy bookcase having used him to make built-ins in 2011, created some shelving in this awesome playroom, sidled him up next to a Besta in my office, and for the fourth time we’ve again partnered together. Now, two Billys flank the French doors in the guest room (also our oldest daughter’s room when she’s home from college) but this time they’ve been beefed up a bit so there a hiiiiint more stylish.
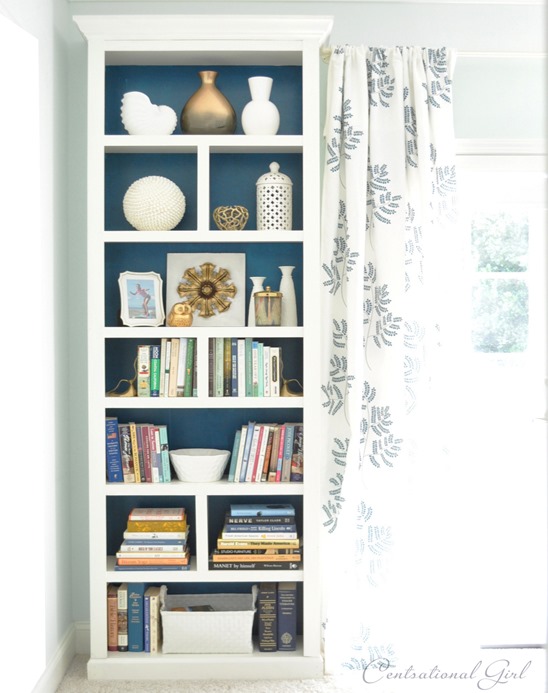
I used the basic 11” inch deep Billy with the extension on top for added height. We mimicked some things we’d done in the past, adding crown like with this set of Billys and baseboard like with these Billys and thicker trim like with these custom built-ins in our family room to make the shelves appear thicker and more substantial.
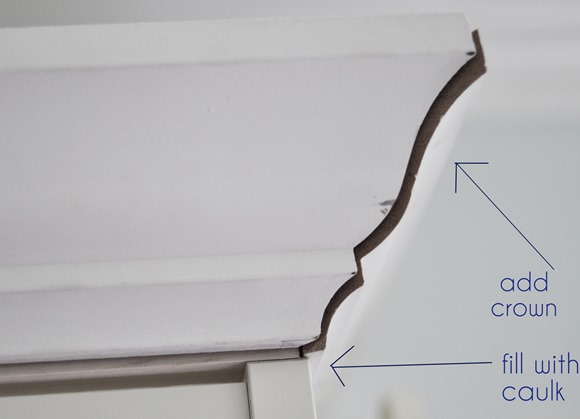
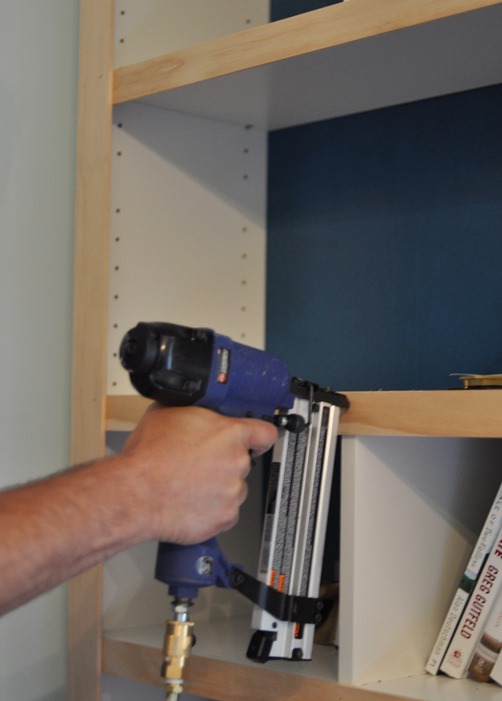
To beef up the fronts of these basic shelving units, I chose 2 ½” lattice trim for the vertical sides and 1 ¼” lattice trim for the horizontal shelves, both purchased at Lowes. We attached them with a brad nailer, and I painted them to match (I used some leftover ‘Dove White’ by Valspar, a nice match to Billy white).
To create the dividers, I bought extra Billy shelves for $5 at IKEA and Matt trimmed them with the miter saw to fit vertically between the shelves. They’re secured with a few brad nails. The result was a more custom looking bookshelf with division every other shelf. The backs are painted in Glidden’s ‘Regal Wave’ a dark moody blue.
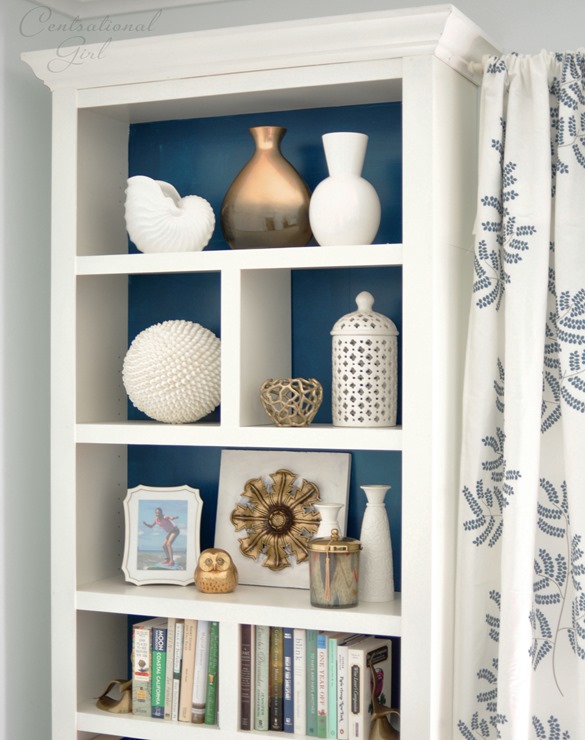
We added a second bookcase on the other side of the doors for additional storage and a balanced look.
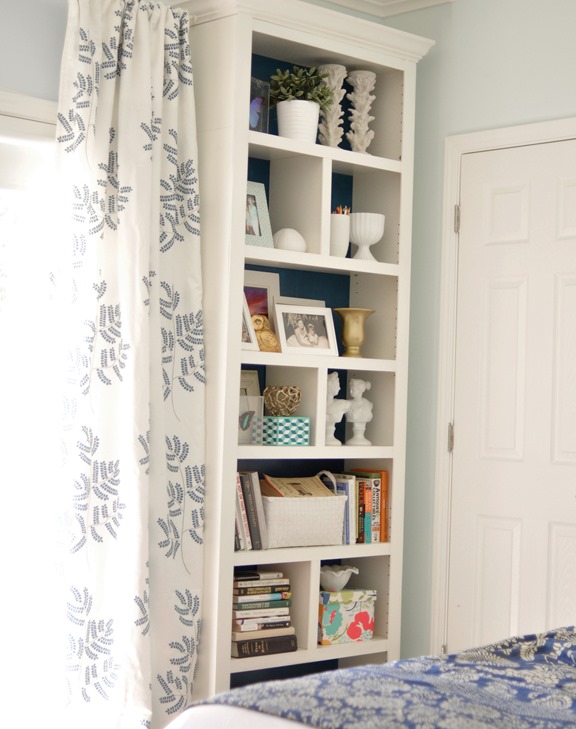
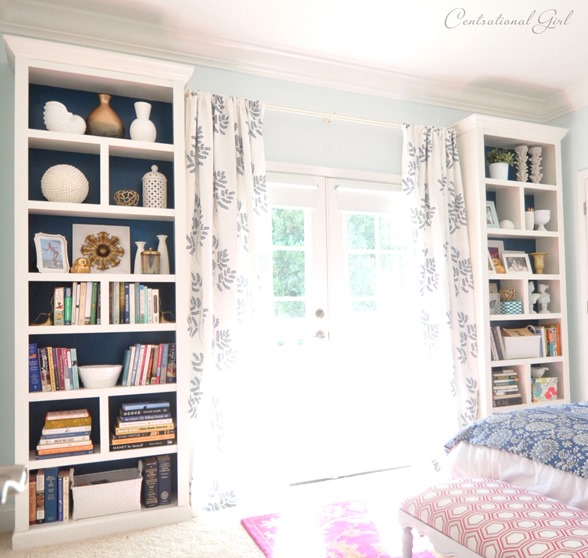
*Sorry for the blown out pics, I photographed these later in the day than expected, but you get the idea.
I still have to repaint the walls and find a decent dresser for the space, but it’s coming along nicely. More details on this room in the weeks to come!
.

You do great work as usual. What you do to those Billys are things I don’t think the creators ever imagined possible. They are awesome and it’s definitely inspiring me to trying something like this in my house.
Hi Kate!
I’m so curious about the curtains…did you make them? If so, do you remember where you got the fabric? Love your blog!
xo,
Tammy
Fabric on the curtains is one of my designs, will be available soon Tammy!
This looks amazing! Your site has the best tutorials, easy to follow. Can you advise what nail gun you have as well as air compressor. In addition, do you own a spray gun ? Can you do a post on your favorite tools, paint brushes, etc. please. Also, what’s in your tool box, assuming you have one. Thanks so much.
I can’t wait to see the whole room and I love the color on the back of the bookcases! I recently relocated to South Carolina and we are building a home. Your site is definitely my inspiration for my new home design. I found out there is no IKEA in the whole state-yikes! I would love to see a post about shopping and ordering from the store. Also, the downstairs of my home is one giant space and I am struggling with furniture layout. Do you ever do consults? Thanks for all the great ideas!
I love how you beefed up those Billy bookcases. They look amazing. They frame out the french doors beautifully.
Perfection! This actually makes me rethink the built-ins I’ve been considering for our new den.
Love these! THANKS for the tip!
I love how you made the shelves look chunkier! Great idea!
I’ve been reading your blog for a few years now, and have never commented (for shame). You are an inspiration! I love the blue in the back of the shelving – I have a question as to how you get back in there to paint it if the shelves are already fixed. I’m afraid I’ll mark up the shelves. We closed in a window last year and put shelves in and now I’d like to paint the back.
Hi Erin, I painted the backs before I assembled the bookcases, but if yours are already up, I’d just remove as many shelves as possible – the ones that aren’t fixed, add a coat of primer and two coats of paint with an angled brush and steady hand!
These look awesome! Makes me wonder where I might need some Billys :)
I saw your post in Bloglovin (so I just saw a summary) and felt me eyebrows rising as I read the title and the first 2 sentences. You got me. :) I think I might be in love with Billy now, too. He’s gorgeous.
These are fantastic – I have been considering them for my office, but wasn’t sure if they’d look built-in enough! Love the addition of the crown & thicker shelves!
oh kate….you do such miracles with furniture. definitely on my to-do list for a new house someday.
Are the backs of Billy book cases wood? I want to paint the backs of our built-ins but they are formica or some white shiny pressboard and I hesitate to start.
You do great work!
Hi Kate,
Another great Billy beautification! I may be missing it, but I can’t seem to find a post in which you explain how you paint them. I painted ours and while they turned out ok, it was a huge hassle and the paint all started peeling away when I put the shelves back in. I have hated them for almost 4 years now and would love to give them a refresh. Thanks for your help!
Olivia
Hi Olivia, I only painted the wood trim, not the entire bookcase.
I painted the back dark blue after I primed it, and before they were assembled.
I used Bullseye 123 water based primer and Glidden’s ‘Regal Wave’.
Hi! Did you use the 31 and half inch long or 15 and 3/4 long billy bookcase for this project? I love this idea!!!
The 31.5″ wide versions Molly.
Kate, once again you’ve got me thinking and wondering….could this work for me? I, too, have a bedroom that needs revamping. In my case it is because my oldest daughter has decided to stay home and attend a two year college here in San Diego (Sonoma was on her list but, alas, she feels she is a So Cal girl at heart). Her room is on the small side so going vertical makes sense to me. While it already is very stylish, I’d like to give her more of a sophisticated look as you’ve done here. I’m thinking that mounting a table top between the two bookcases to serve as a desk might just be awesome…now that you have so much experience beefing up Billy, my question to you is, do you think your boyfriend is up to that?
That’s brilliant! What a great custom look – never would have thought of that spin on the Billy bookcase – I love it!
Hi Kate, I love this look! Thanks so much for the demonstration, looks much simplier than I’d thought. I’d often looked at the Billy bookcases for similar projects but wasn’t sure how to customize quite the way you have. Also I love the window pannels, would you mind sharing where they are from or if you made them the name of the fabric? Thanks so much! Love your blog!
You always have the most amazing IKEA hacks! This is fantastic!!
Amazing! I love your beefed-up Billy’s! You make me think of the Billy in a whole new light and I can’t wait to try these in my own home. Thank you so much!
This is such an amazing transformation to what normally is, a bland piece of furniture. You are seriously the QUEEN of furniture make-overs! You totally inspired me to re-finish furniture and so far I’ve already done 2 chairs and I have 2 Queen Anne end tables to refinish as well :D
Fabulous Kate!
Looks great! The first time I came across your blog was when I was searching the ‘net for ideas on converting my Billy bookcases to look more built-in and I read your previous post about replacing your media center with built-in Billy’s. Thanks so much for sharing your DIY, I’d like to eventually try this myself.
Gorgeous! Love how you used the less-bulky lattice boards for the trim.
I love this! I might need to make a trip to ikea STAT! :) YOu sure made it look non-IKEAish. ;)
I also love the curtains and can’t wait for your fabric to be available. Love all the patterns I have seen so far. Nice designs!!
Umm…so pinning these for the future!
Love what you did – thanks for sharing!
Hi Kate, I am an avid daily reader – and L.O.V.E everything you do ! You are so amazing and such an inspiration – I find myself sitting here reading, many times with my mouth hanging open and thinking to myself – WOW, why did no one ever think of this before…. :)
Anyways – I was just wondering on the paint part of this make over. I have tried to paint furniture from Ikea before, but find that it doesn’t look as finished and as polished as in your pictures. Do you mind sharing what paint and primer brand you use ? Do you sand before you paint ? I believe I read somewhere that you should use Oil Based Primer on Ikea type furniture… not sure if this is correct ?
Thanks so much !
Thanks Danielle! I don’t paint the bookcases themselves, you can if you want but because they’re a MDF like product, you’d need to use a bonding adhesion primer that works with laminate-like surfaces, so in that circumstance I’d use the Zinsser Cover Stain I always talk about. In this case, I only painted the backs (primer plus paint) to match the Billy white.
Kate
The bookcases look amazing. Another wonderful project!
I am wondering though why you didn’t move the bookcases all the way to the corners of the room for a built-in look and just extend the curtains to fill the center. The small gap on each end looks like it would be hard to clean and would also provide a challenge at wall painting time.
Hi Kate! I’m wondering why you decided to sit the bookcases a few inches from the wall, instead of notching the bottoms for the baseboards and sitting them right in the corners? Those few inches between the bookcase and the wall look like an easy space for dust to gather and like it might be difficult to get with a vaccuum, but I’m sure you have a good reason!
Hi Maggie, the Billys are only 32″ wide and the wall is 44″ wide so I wanted them to look balanced as free standing units rather than shoved up against the corners. Make sense? There’s 5″ on either side to get to, no worries about a vacuum.
Oh my gosh! This is such a great idea. Honey-do list item added ✅
Claire, I wrote about my “essential” DIY tools here, and it includes a nail gun with compressor!
http://www.centsationalgirl.com/2011/11/my-25-essential-diy-tools/
I have two by Campbell Hausfeld, the one I use the most is the 1 Gallon Compressor with 1.5 – 2″ Nailer/Stapler (18 gauge) – my favorite tool!
Kate
You did it again. Those inexpensive Billy’s look like they cost a $1,000 each. Wow!! Love the curtains too! Well done girl!!
Hi Kate, I Love your blog! Great job with the Billys! I am inspired to re-vamp my bookcase!
Gah!! That room looks amazing! Love all the colors…and when/where can I get my hands on your fabric!?
Woot Woot! My daughter Ms. M has been after me for bookshelves. 15″ is too deep for the space. 11″ just right! Being in Phoenix, these are great summer, indoor projects for us @ 118 degrees (I exaggerate not). I’m on it!! xoxo
GORGE!!!
We are in the midst of working on copy-cat built-ins from the first billy’s you transformed into built-ins. I am loving the dividers on this one! Wow!
Thanks for always inspiring us :)
Jenny
http://www.simcoestreet.blogspot.ca
P.S. If you’d like, I can share the link with you when we do finish them and post about it. I’ll be linking to your blog since we borrowed so many ideas from you!
WOW!! Love the dark background and the chunky molding. They look super expensive!! Great job!
I am very impressed! Look brilliant!
FANTASTIC! Love a good Ikea hack.. these look sooooo good.
xo Nancy
powellbrower.com
I have followed all your Billy ikea makeovers and have loved them all. I am definitely going to tackle this myself…thank you for such wonderful inspiration. I look forward to getting my hands on some of that material as well. Beautiful curtains!
I recently invited Billy to my house and I’m expecting him soon. This is exactly the kind of thing I have in mind. Thanks.
The dividers really ad space and looks to the home. Good job guys!
watch out IKEA is going to hire you! love the project!
Love them Kate!! You’ve just inspired me to make these to flank the window in my office! I desperately need storage for books ect and this will be so functional and beautiful too! You are so clever to add the extra details – I can’t wait to see the room finished! Pinning. Heather
Wow Kate, I love this!!!!! We are planning a expansion of our master bedroom and hope to include french doors out to a small balcony. Now I can surround them with your Dr. Billy’s :) Thanks for the inspiration and ideas.
I just got my first Billy, love what you do with them. What color did you paint the crown molding and trim to match the bookcase?
Another great post! Thank you so much! This is inspiring!
Hi there! Love your work.. again! You mentioned using lattice strips. Are you referring to the actual lattice used in garden lattice panels? You mention the width, but not how thick they are. Or are you using flat stock? I have been eyeing 16′ of bookshelves I want to make more attractive and here you are today!
Thanks.
Hi Christine, they’re called “lattice” at Lowes, but look for them in the trim and molding section, not the garden department. The store personnel should be able to assist you!
Kate I love most of your fabric. Where are you selling them?
Amazing as usual – I never would have thought to use extra shelves as dividers but they look so gooood!! Love the totally custom look you created!
Oh my goodness! I LOVE those curtains! I can’t wait till that fabric is available!
These look wonderful, Kate! You and Billy make quite a couple, that’s for sure. But I’m glad you continue to beef him up a bit. He’s better off when in your company!
Love it!
I’m going straight to the tool round up, thanks for including that! I hope it gives us other reasons to invest in a Brad Nailer (and a compressor also??). I’m sure it’s great to have one, but can you suggest an alternative to the Brad Nailer? And how did you camoflage the nail holes, or indentations?
Thanks! … You were born for this s#*%!
Is your curtain fabric available yet?
I love your curtain design! Is it still available? I don’t see it on Spoonflower. Thanks!
Hi! How do you disguise the ugly shelf supports? Thanks, Lindsay