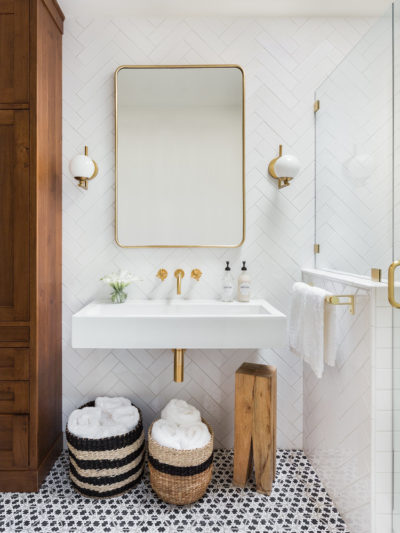
Well at last at last at last we’ve finally finished up the backsplash in the hall bathroom. This remodel has been in progress for over a year, we procrastinated, but now we’re on the way to a nearly complete bathroom remodel. Here’s a look at the vanity wall where we installed a new backsplash, added new sconces, and also a brushed silver finish mirror.

Here’s what it looked like a year ago. It had an old fashioned overhead light, a huge builder mirror, honey wood cabinetry, and cultured marble countertops. Not my favorite.

The sink vanity wall looks much different today!

I call this the “lucky backsplash” for two reasons. First, I ended up skipping the blue brick pattern glass tile I mentioned awhile back because when I did the math it turned out to be way over my budget at $20+ a square foot and to tile up to the ceiling I needed 36 square feet. I was leaning toward something more neutral anyway.
I found a more reasonably priced mosaic blend tile at $8 a square foot at Lowes, but when I went back to purchase it two weeks later, it was gone from the shelf and discontinued and I was heartbroken. As I walked out of the store and glanced to my left I saw the clearance rack off to the side and sitting on that shelf was the exact same tile I saw two weeks before. It was the exact amount of tile I needed to complete my job, and not one sheet more, and it was marked down to $4 a square foot. Score!

I loved how it had a mother of pearl-ish quality to it, with various tones of white, taupe, subtle amber, and cream, I’m a sucker for anything that is or resembles mother of pearl – it’s one of my favorite finishes evah so I went with it.
The second way we got lucky was because we were able to install the entire backsplash without a tile saw since the pieces a) fit the wall to perfection and b) I was able to complete the job with a little tool I found at Home Depot that saved us the inconvenience of renting or borrowing a big ol’ tile saw.

There are a zillion tutorials out there for installing a mosaic tile backsplash and I know I’ve also covered this before, but here are the quick basics – prep your wall but make sure the sheetrock is both even and sound, and then make room for the tile (with extenders) around fixtures or sockets.

Layer the thin-set mortar on the wall with a trowel and use just enough to work with a few sheets at at time. Use a level as you go along to make sure your tile is straight as you install. Allow the mortar to dry for 24 hours.

The sheets of mosaic tile fit the wall perfectly (lucky!) but not so much around the sconce boxes so I picked up a nifty tool to help me out.

This little tool allows you to clip small tiles without a tile saw for those hard to reach places where you need little pieces.

Just be careful! Little bits of glass can go flying so it’s a good idea to have safety goggles and even gloves to avoid injury. But what you get are those little corners you need to fill in where necessary.

See?

Mix up your grout and get in in between all the joints with a grout float in sections.

Before it dries, sponge off your tile with a grout sponge and let it dry for another 24 hours.

On the vanity, I also replaced the little knobs with more substantial pulls in a chrome finish.

I love the new sconces on the wall and how their shiny finish is a nice contrast with the brushed silver on the mirror. The Hill and Dale Mirror is from Lamps Plus and the long arm chrome sconces were a splurge from Shades of Light – they gave me small discount since they’re a sponsor. The vessel sink + faucet combo is from Home Depot.


We’ve got a little more work to do, I have to finish priming and painting the cabinetry on the back wall and I’ll be switching out the overhead light fixtures too.

As soon as I finish them I’ll do an updated step-by-step on painting bathroom cabinetry, I’m using Ben Moore Advance in ‘Soft Chamois’ which is a slightly warmer white.
Here are some of the projects we’ve done in the past to get to this point:
Building a new base and adding feet to the vanity
Adding an ogee edge to wood countertops with a router
Installing the wood countertops

The best news is we now have a functioning bathroom again with a much more modern look!
.


WOW!! That’s beautiful!!
holy moly- it is stunning!!!! so beautiful kate! i love the scale and shimmer of the tiles.
Looks AMAZING!! What a huge difference!
This is just beautiful Kate! And lucky is right! How often is it a perfect fit!? I literally said “wow” when I saw that first photo come up in Reader. You did a wonderful job!
beautiful! love all of your choices.
Wow, this looks amazing! I look forward to seeing more!
margy
I love it! Sometimes perfection takes a while longer than you think!
Wow! So lucky, and it turned out absolutely gorgeous!! Great job! :)
~lisa
Floating Along
Design fate at it’s finest! Love the look, especially the contrast of the tile backsplash and wood counter.
Gorgeous, love everything you have accomplished beautiful !
It looks great! the sconces are lovely. Just wondering, do they give off adequate light for someone to do their makeup in that mirror?
What a transformation! That back splash makes the space – what a great find!
SCORE! Looks so stylish and lovely.
Oooh, turned out gorgeous! I love the shimmer and sparkle and that it goes all the way to the ceiling–exactly what I want to do eventually! And thankyouthankyouthankyou for the close-up shot showing the extender for your sconce. My entire has has that orange-peel texture on the walls and I have been trying to figure out if I could tile directly over it in my kitchen and bath to create a new backsplash. Looks like I can! I knew I couldn’t do that in a space like a shower because it wouldn’t be completely waterproof, but I’m thrilled that my prep work will be a little less with my upcoming projects.
It’s sooo beautiful! I love the story of how it came together so perfectly!
Beautiful! What is the wall paint color/brand?
So pretty! Love it.
It’s so beautiful, Kate! And, I am SO glad it took you that long to finish it. Now I don’t feel so bad about our drawn out projects. tee hee. :)
Beautifully done Kate. I would say that tile was a “meant to be” for you sitting there waiting in the exact amount that you needed…better yet on sale! Love the look of the tile going from counter to ceiling.
Agreed Allison, I think it was all meant to be mine!
Wow, what a transformation. The mosaic tile, the new mirror and the sink are amazing. I love the color scheme. Gold mirrors are so tired. I love the neutral feeling but with the gleaming silver. And you got a bargain! Good job!
Love love love it! I really admire your amazing DIY skills and you’re inspiring me to learn some basic building skills and start getting my hands dirty!
Oh wow, your bathroom is stunning…I adore the full tiled wall! You have such amazing style!
thank you for this, beautiful blogger. it looks like a million bucks, and i feel inspired!
michele
so beautiful… our original picture looks like all the bathrooms in my house. this transformation is so doable! this looks like a spa.
Love the new bathroom! i’m impressed you did this all on your own- it came out looking professionally made! Great job!
Your lucky tile is now my lucky tile!!! After two hours of searching for it, I finally scored some for my upcoming bathroom renovation. I live in San Diego and have to pick it up in Arizona, but, it’s mine…already paid for and waiting for me. Yippee. Now, if you wouldn’t mind, could you answer two quick questions? I see you used white mortar. Sometimes the color of the mortar can change the color of the more transparent tiles. Any issues with that? Your grout seems to be more of an off white? I love the look (and price) of clean, basic subway tile for the shower which I will use some of this tile in as well, as an accent. What do you think of the combination? Feel free to be as honest as you’d like…and thanks so much for the tile inspiration!
Wow Ami if you have an online source, would you be so kind as to share it? Because the tile is a really nice neutral that would work in so many bathrooms or kitchens! For the grout, I used a combination of pure white and antique white so it’s more of an off white. I love the combination of subway tile and mosaic glass, we did the same thing in our master shower, here’s a post from several years ago to show you how they look together, the images aren’t that great which reminds me I need to take some updated pics!
http://www.centsationalgirl.com/2009/08/vacation-at-home-master-shower/
Kate
Looks centsational! What a difference! I’ll bet you were holding your breath as you were counting the tile! I was wondering about the electrical work. Did you have an electrician do the wiring? I have a similar bathroom where I want to change to sconces.
Yes Monica, when the electrician came last fall to change the ceiling box in the kitchen from one to two we had him do the same in the bathroom – I get squeamish with electricity so I did hire an electrician to do it for me and it only took him a few hours to do both the kitchen and the bathroom.
The back splash tiles are beautiful! We’re looking into square mosaic tiles for our half bath. I will have to show my husband! It looks so fresh!
The bathroom looks great! What an upgrade. I am curious…what is the wall color in this room?
Hi Katie, the wall color is incomplete, it’s only finished on one side! But the one you see in the first few images is Benjamin Moore Affinity in ‘Tranquility’ – it’s a lovely soft shade of gray blue.
Kate
OMG, I had the same exact tile in my other home and I loved it. Your bathroom looks so pretty!
Love it!! But the best part is the hubby was standing right here when I saw and he loved it too and gave me an ok to try something similar!
It looks terrific. I really love that tile a whole lot!
This is absolutely georgous! I was getting ready to ask about the electrical work since we’re getting ready to tackel an overhead light in our kitchen but I see you already answered that queston!
Seriously….BEAUTIFUL!!!
beautiful kate!!! never thought of doing all the wall behind in tile! genius! Great job! Just a quick question, how did you re-wire the lighting for the sconces? did you use the wiring from the orginal lighting and tunneled it to where the sconces are now? Thanks!
Hi Vel, there is a process that is required by code, different counties and states are different. I was gone during the hours our electrician did the wiring running errands but as I recall from what he told me, he routed the existing wires to one new box, closed off the existing one in the center before it was patched, and then ran new wires to the new sconce box. Make sense?
Of course! I’m more than happy to share what I found. I did a search on the website for Lowe’s and came across a 12X12 tile called White Linen Tones Glass Wall Tile. Product number is 354392. Like I said, here in San Diego, I could only find two or three pieces in each Lowe’s across the county. It is a discontinued item (why???) and you really have to search for it in your area (or in an area where your family lives, which is what I ended up doing). Because I am so persistent for information on products, I did get the number for the manufacturer in Canada…905-771-3800. Now Kate, that being said, this may or may not be your exact tile. The price point is the same and the mother-of-pearl description would be the way I describe it as well. It looks a bit lighter than yours but that may be because of the difference in packaged product versus product on the wall with mortar. Anyway, I love it and hope that helps your readers!
It looks amazing! LOVE IT!
Wow it came out beautiful!
Beautiful ! And the price was great too :) Good job
I LOVE IT! I would just sit in there all day if it were mine. Well done!
The new look is great, although I really liked the old mirror and lights. I would have died with those pine cupboards though. Can’t stand pine. And my whole kitchen looks like that. Ugh
Gorgeous! What a difference! Great job. So inspiring.
Seriously gorgeous. I love all of it!
This transformation is amazing!! I love every inch!!
LOVE it, Kate. The tile looks fab with the counters and the mirror / lamps. Great choices! :)
Don’t you just love finding a deal on something like your tile?!?! And half price??? Can’t get much better than that!
This so beautiful Kate. I am sure you are glad that it is finally finished. The tile is so pretty and the vanity top is gorgeous. I also like the sconces
Cynthia
It looks so so great – what a difference it makes!
Good job you guys. I bet you will love not having to wipe water splashes off the mirror every time someone washes their hands now. I am always wiping my mirror in my old bathroom, (next years project). When we built our new bathroom, I made sure the mirror was high enough to avoid most of the splashing! Your bathroom is truly stunning!
Oh yah….good score on your tile too!!!!
This turned out beautifully!! I think the tile and wood counter are a perfect pair. I would love to see some brassy gold in there, too. Maybe a few tall brass antique vases/urns? Great work!
WOW! This looks AMAZING!
So pretty and so ‘you’! How fortunate you found this tile. It was waiting for you to take it home :). Aside from the usual oogling (is that a word?) the one thing that stood out to me was you said the tile was $4.00 when the sign says $3.99. I am giving you a cyber high five for that one. Pricing things that way is kinda a pet peeve of mine and a cheap (albeit effective) marketing trick which I never fall for and glad to see you don’t either ;). It’s funny, as I’m typing this a HomeGoods commercial just came on advertising a chair for $199.99. Lol. Really?!
Beautiful!
It looks amazing. Job WELL DONE!
Looks great! I was wondering how the countertop is holding up? I know it has been a few months since you installed it. I am thinking of using the same IKEA countertop in my kitchen. Seems like a great deal for oak countertop that I can customize to the color and edge I want. Has the Waterlox worked for you?
So far so good CJ but we haven’t used the countertop all that much since we installed it, we were waiting for the backsplash and mirror. I’ll know more about how the wood countertop is holding up in a few months!
Kate
Amazing! Loving the tile…
Kate, it looks beautiful. Love the colors and “sparkle” you added!
Gorgeous! Love the tile.
Wow! What an update. From a basic bathroom to a gorgeous one. It looks like you had to remove the baseboard to fit the vanity back into place but I can’t see the bottom exactly. This is a great solution for those of us that have built in cabinets that are odd sizes. I thought the only way to replace those would be to order a custom size…..now I’m thinking of repurposing the original. Thanks for the detailed directions, Kate.
Gorgeous, Kate! You make it look so easy but I’m not fooled ;-). And I see you’re doing it . . . only one space at the end of a sentence. Working 20+ years for a law firm and constantly telling (younger) new hires to use two spaces all this time, I can’t wait for the first one to show me it’s no longer required – not!
Ha! Patti I’m curious if the legal briefs will ever change to 2 spaces?! I confess it’s physically so hard to do it being a former lawyer myself!! let me know what you find out!!
Kate
That’s actually how we got our laminate flooring for our dining room, out of the Lowe’s clearance. It was a customer order that was never picked up, so they marked it at 60% off and had exactly the amount we needed!
I love your bathroom’s new look. The tile is beautiful!
It is GORGEOUS!!! Can you please tell me what the paint color on the wall is. You have helped me with some much needed inspiration for my boring white master bathroom.
What a transformation! I looks beautiful!
Looks beautiful and spa worthy! It’s come a long way! I get a little bit giddy hearing about people scoring the perfect deal. :)
looks great and on a small note, I never thought to put a small clock in the guest bath but love the idea…how practical and thoughtful for your guests.
This bathroom is beautiful! So, so much nicer and chicer than the “before”. I love the mother of pearl tile too…what a great find!
I noted the paint you used on the bathrooms cabinets. Can you tell me if you ever use chalkpaint in the kitchen or bathroom? I know you use it on furniture and love the look.
Beautiful job! I love that it looks elegant even though it’s a bathroom for your kids.
And to out myself as a legal writing nerd: It’s one or two spaces after sentences on legal briefs unless a court has special rules. I see it either way in court papers (and I always stick to two).
Sigh…so gorgeous. I adore the wall of tile and the wood vanity top was such a good choice. It adds so much warmth and texture and looks beautiful with the white paint you chose.
YES, that tile cutter was a life saver when we installed a glass tile backsplash in our kitchen – lots of outlets! The bathroom is looking beautiful!
We followed your lead (i.e. copied!) with our son’s bathroom remodel and put the existing vanity cabinet on “feet” to give it extra height. Replaced the cultured top with a scrap piece of Kashmir White granite from our favorite granite yard and I painted it Dove White from BM with the Advance formula. I’m a novice furniture painter, and thought this gave such great coverage. Before we even started the renovation, a Lowe’s in our area was closing it doors – we were able to score that same tile for 50% off the retail. I think that put it at $4.50 per square foot. We bought a bunch as we weren’t quite sure how we’d use it, but ended up using it as the basis for the whole remodel. Your bathroom looks great!
You guys did an amazing job.
Stunning! Truly just beautiful. Can’t believe it’s the same bathroom!
Aloha,
Charlie
Gorgeous! Great work!
I especially love this, because the ‘old bathroom’ looks almost identical to the bathroom in my brand new house that I thought was pretty enough. Looking at what you updated to I’m wondering how I never thought of something like that! You definitely have an eye for it!
Beautiful! What is the paint color on the wall?
The paint color is Benjamine Moore Affinity ‘Tranquility’ Lafertty.
Looks great!
Wow, what a lovely transformation! That back splash is so beautiful!
Hi there I love the mosaic blend tile you put there.
It looks really clean fresh now.
The mirror looks so nice too.
Congrats! You did a great job on that.
You deserve an applause!
This is gorgeous kate! I love the added “feet” at the bottom to make the stock cabinet look custom. the mosaic tile on the wall is beautiful and looks great with sink. What a difference huh? Pinning to the BHG board, unless you already did! :)
Of course, it is perfection. You and hubby are so talented and have such great taste and really know how to put everything together to make a perfect space. Job well done.
I love the bathroom, would love to know where the mirror is from?
Well, it looks absolutely beautiful, friend!!!
:-)
shaunna
Oh my word. You have done it again! Can I borrow you for a year or two to do my whole house? So impressed!
xoxo!
Jen
Beautiful transformation…well worth the effort, congratulations!
Bathroom looks super, love the sconces and you did a great job updating the vanity! Now relax and take a bubble bath!
That bathroom is looking so gorgeous!!! What a perfect space. I adore it, Kate!
xo,
Shannon
GORGEOUS!!! You are such an inspiration Kate!
Wow! what a beautiful transformation! And it’s amazing how much bigger the bathroom looks too! Beautiful job!
Vera
My favorite thing about your blog is that you give all the product info. and project instructions.
It makes those like me be able to duplicate your ideas with confidence. Thank you so much for
sharing! Just love this look and want to use it for my powder room make over. Take that as a big
compliment…I have been looking forever for inspiration.
1. Could you tell us the product name and color of the grout you used?
2. To hang the mirror, did you have to put a screw in the wall first, or were you able to do it
after the tiling was all done?
Thank you, Donna
Hi Donna, I used a combination of Antique White and Bright White grout from Home Depot. The mirror has two D rings so to hang it we just used two large screws, measured their placement, and drilled them into the grout and wall.
Kate
I’m in love, love with those lucky tiles! And I picked mosaic tiles for my kitchen and my contractor friend who installed them cursed me the whole time! They were unlucky tiles that needed too many cuts!
:) Linda
What a huge difference! It looks fantastic!!!
Beautiful remodel. Would you mind telling me where the little clock is from?
Target last year Tracy, I think I paid about $10 for it!
It’s looking great in there, Kate! I think my favorite part is the wood counter tops… just beautiful.
Beautiful! Can you tell me how you got the builder’s mirror off of the wall? I have the same mirror in my master bath, and I’m afraid to even touch it. We had the same kind of mirror in another bathroom and luckily it just fell off of the wall one day. It looked like they just put it up with liquid nails in four spots!
Wow, making the choice to tile the whole wall makes it look sooo much bigger and more dramatic (but in a subtle way). Love it!
Would you consider doing the same project in a master bathroom as well?
Heck ya Jessica, I love the look!!!
Kate
Hi Kate – Maybe stupid question, but do the wall sconces actually work or are they just for looks? TIA!
They are hardwired electrical sconces Sara, yes they work!
Kate
Hi Kate – love your re-do! What color are the walls? Thanks!
Hi Erin, the walls are Ben Moore Affinity “Tranquility”
HI
How did you install the mirror on the tiled wall? We are going to be tiling our vanity wall in a glass/stone mosaic blend and I just ordered the mirror and was wondering how you go about hanging it in this circumstance. Thanks
We measured the width between the two rings on the back and then used two screws on the tile wall, we figured out where they would sit in between tiles and hung it up!
I noticed your walls are slightly textured. Did you not do anything to them to prep them for the quickset or tiles? We have orange peel (medium) walls and want to put tile as a backsplash in our kitchen, but my fiance thinks we need to smooth the walls first.
As long as it’s not extremely heavy texture you should be fine. We have a lighter version of “orange peel” and I haven’t ever had problems. If you use enough mortar, then you should end up with an even application.
Kate
Hi! Awesome remodel, its so lovely! I’m wondering how you moved the wiring for the old light to fit the new sconces. Do you have any tips?
Monica