Matt and I have been discussing the idea of constructing a rustic table for a few months now and we have a local salvage yard nearby that offers different kinds of reclaimed wood for just such a project. We’ve gone back and forth on whether we want to build one for the outdoors or a slightly more polished version for our kids playroom area, soon to be converted to a study.
A few months ago I got an email from Will of Windfall Cove, introducing himself and we struck up a conversation. I’m so fascinated with this process so I asked Will to share some more information about how he builds a reclaimed wood farm table.
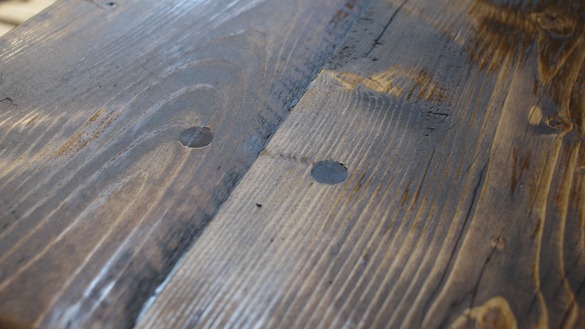
Will and his business partner Brian used to work in fire and medical services, but had a long time passion for woodworking, so they decided to follow it and begin a new business building furniture for people in their area and Windfall Cove was born. (I love these kinds of stories!) In their Massachusetts town, Will and Brian handcraft heirloom quality rustic pieces with weathered and reclaimed barn wood (detail seen below) with their customer’s custom design in mind.
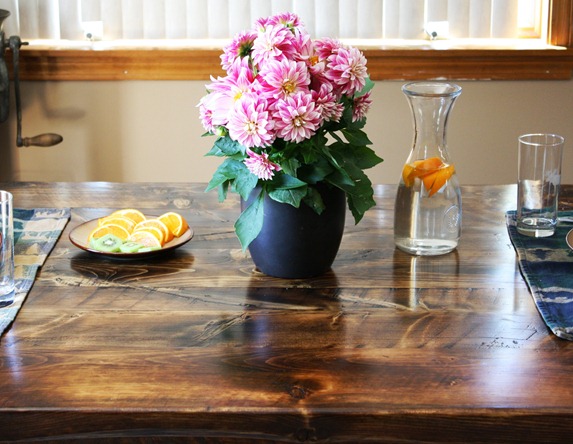
Here’s Will to share the process of building a reclaimed wood farm table:
“Hello CG readers, Will here to share with you how a table goes from order to completion at Windfall Cove. Our clients usually have a familiar story. They have a particular space in their home or office that is in need of the perfect piece of furniture. After they have shopped with furniture stores and either are dissatisfied with the options or found that items sold cannot be ordered to the exact size or style they are in need of, we come in to build a custom table for them.
Once we are contacted we will start a plan discussion with our client to talk about the design, size, stain color and work out all the details for their project or simply brainstorm an idea. We build each piece to our client’s specifications, we are proud of our finished products and love hearing from our clients and seeing the piece in its intended place.
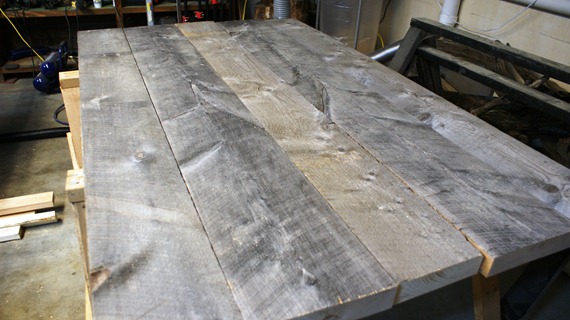
We regularly visit an old saw mill that was originally built in the early 1900s and still saws Northeastern White Pine now generations later. With our customer’s design, we head out to the mill and there, we hand pick each weathered or reclaimed board that will be a perfect fit for the project. In our shop, we lay out the boards, line up grain patterns, and rough cut the length.
Each board has its own grain pattern that is produced during tree growth. A series of loops, lines and knots provide different patterns. At times, we are able to find two boards that were cut in sequence from the log and provides what we call a "book match". Since boards are moved all around during the sawing process, it is difficult to find boards from the same tree at times.
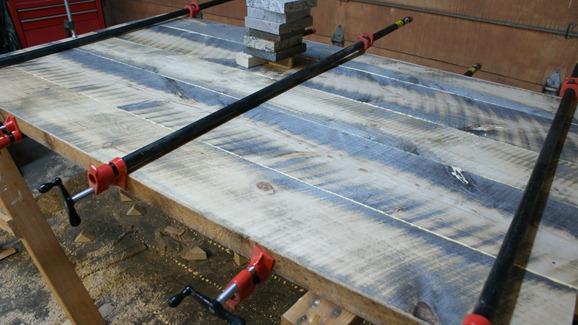
We use a common bonding process to join the top boards using high strength glue, biscuits and bar clamps to secure.
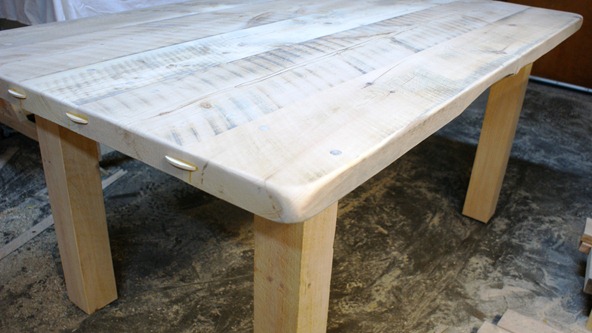
After drying overnight we trim and hand shape the top, grinding and sanding methods are used to get the desired texture and shape.
We offer a few base styles, this particular project known as the common "Farm Table" has square legs with an offset. Other base styles are available, such as our version of the Industrial Trestle and a more modern Parsons style as well. At this point, we will construct the desired base for the table based on the customer’s specifications. Here, 4 inch square legs are attached to the newly constructed apron. We use Red Oak for the corner blocks to provide a strong anchor point for the legs.
During this stage of construction, we can add a few rustic characteristics to enhance the finished product, such as dents and dings made with a chain. Many items with different shapes, sizes or textures can be used to either strike or scrape the wood surface adding character to the wood that will be enhanced once the table is stained.
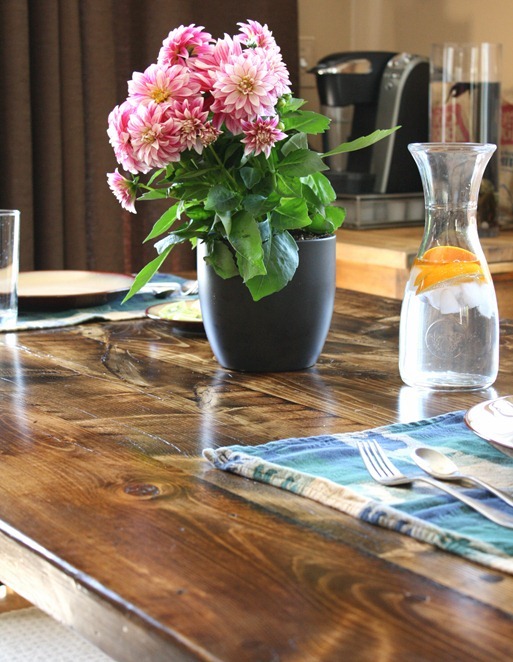
Once we assemble the base, using the same rough cut wood stock as the top, we attach it then stain the table to the customers specifications. Common stain colors tend to be within the brown or red family. We also have and continue to research natural stains like coffee, wine or even sediment from old nails left in a bucket to rust. Our research has shown that the natural stains do not have nearly the color pigments within manufactured stains, however does have a slight tint that would appeal to a client that desires more of the bare or natural wood finishes.
To finish the table, we use a polyurethane and apply two coats over two days. A little light sanding and a natural polish, and the table is done. It is always a nice addition to any room for gathering with family or friends for a home cooked meal and conversation.”
Wow, that wood has so much character, don’t you think? This is not a sponsored post, I just loved their story how they followed their passion and I’m so fascinated with this kind of handcraftsmanship!
If you have any questions about the process, feel free to ask them and I’ll have Will follow up with some answers!
.


This is GORGEOUS!!! From the rounded corners to the details in the wood, I love everything about this! I’m motivated to try our own!
BEAUTIFUL. I dream of the day I have enough courage to try making my own furniture instead of just repurposing. I love the rustic look that table!
WOW! It’s gorgeous, Kate! Thanks so much for sharing their work! I love the care they put into each detail. Just beautiful! A worthy story to share, indeed! Have a great day! ~ Virginia
Someday I will have a table from reclaimed wood for my kitchen.
I so have a manufactured one for the dining room that is similar, but lacks the heirloom quality that I am looking for.
Thanks for their info! Great story!
Fabulous, I especially love the edge treatment. Great project! Jo @ Let’s Face the Music
Beautiful! One question about polyurethane over stain…what is the best product to use and the best technique in applying it? I have always liked 2 coats of polyurethane, but does one sand in between coats? If so, what is the best method of sanding to get a smooth finish? A sanding block? electric sander? what grit to use? The same question goes for the final sanding…technique? grit? Thanks so much!
Absolutely gorgeous! I hope to have a reclaimed dining and coffee tables sooner rather than later.
OMG, My aunt had one made here in LA (http://www.eandkwood.com/) and I loved it! Now this…Is the universe telling me something?
Just Beautiful!
That table is beautiful. My dad owns a saw mill… I have never thought about looking there for scrap pieces of lumber. I’ll have to keep that in mind.
That table is just beautiful, it looks like art, with the beautiful patterns in the wood and finish.
Wow, that is beautiful!
Wow, I am seriously drooling – So pretty. We have been chatting about doing the same.
xoxo!
Jen
I loved this post..I read so many ‘how to’s’ for tables and cringe, knowing some skill and knowledge about wood and joinery should be a factor. These are beautiful and will be the heirlooms they deserve to be..KUDOS to Matt !!
They do beautiful work. We have many local craftsman that do similar work and it is such an art. We purchased a king-size juniper log bed from one of them and it is one of my favorite pieces. I also have a rustic barnwood table (but it was purchased from PB as a gift to me) and I think you would love one as well if you were to build it. Whether new, or old, they add instant character to any space regardless of decor style.
Thank you all for the great comments!! It is very exciting for us and our small company to be featured here! Many many thanks to Kate!
To answer a couple questions…
@ April ~ I have always liked 2 coats of polyurethane, but does one sand in between coats? If so, what is the best method of sanding to get a smooth finish?
Once we apply one coat of poly, we let it dry for at least 24 hours. Cabot has been a favorite of ours for a while… Then use a piece of 600 sand paper over a sanding sponge and sand lightly. Wipe clean with a dry cloth. Dampen another clean rag with Mineral Spirits and wipe down again to get anything left over. Apply the second coat of poly and let dry for 24-48 hrs. Repeat the light 600 sanding. Wipe with a dry cloth. Then polish with “Orange Oil” and its finished!
Please feel free to join our FB group page for more photos and fresh updates! http://www.facebook.com/WindfallCove
Will
That table is amazingly gorgeous!!
What a great feature for this company!
My handy husband built me a reclaimed barnwood table for Christmas (I know I am seriously lucky to have him), and I love it! I wrote about it at the two links below.
http://tatumgreatindoors.blogspot.com/2012/02/our-reclaimed-barnwood-table.html
This is beautiful! I love that it’s reclaimed!!!
gorgeous… thanks for sharing!
Beautiful! I would love one. It’s a little pricey for me though and although I am handy with staining and painting, my hubby is not handy with tools, so I guess I will just have to drool over them.
I heart this so so much. That is pretty much my dream table, just a bit short. I long for a table like this so bad!
Erin
All of our tables are custom built to just about any size. Visit us at http://www.WindfallCove.com for more information. Thanks all!!!
Will
Windfall Cove Custom Furniture
401-636-7495
These are beautiful. I have lots of old barn boards. Now I just need someone to build me a table–and I think Windfall is too far away. :(
Great job on the table I have also built some reclaimed tables and am currently in the process of using an old (90yrs+) French door for my next table.
I have found a rusty chain, an axe blade, gravel, bottle caps, broken glass and a mixture of mud sawdust and rainwater all to be excellent tools for providing that sought after aged look in the wood.
My advice is try something try anything, the joy in building something yourself will far outweigh any store made purchase. If looking for advice or ideas drop me a message through my link.
Thanks for the intro Kate! I’ll have to look them up…..I bet we are close :)
Nice work!
I have been wanting to do this for a while now, but haven’t been able to find a place to buy reclaimed wood (if anybody knows of a place in South Florida please let me know).
One of the hardest steps if doing this project by yourself is the bonding. Any suggestions for a home DIYourselfer? ;) Another thing I’m not too clear is doing the base for the table legs, but I guess I could look for ways of doing that on the internet.
Also, which color stain did you use for the this table?
Again, awesome work.. Keep it up guys! Wish you lots if success on your business :)
I just wanted to say W-O-W
I loved the detail in the work, the structure, the look and I especially appreciate the explanation that went into this post from Will – thank you!
Now if you only were based in Australia, I could happily fill my house with these amazing works :-)
I NEVER comment on blogs, but I have had it in my head that I wanted to try building one of these as my new home office desk… This is exactly what I needed… BTW Yours came out amazing…
Thank you Bryan!